Category: Technical Support

Access official Kales Vehicle technical support resources. Find maintenance schedules, troubleshooting guides, repair manuals, and spare parts advice to keep your semi-trailers and trucks operating efficiently.

  • Semi-Trailer Electrical Systems Guide: 7-Pin vs 15-Pin Architecture & Troubleshooting

    Semi-Trailer Electrical Systems Guide: 7-Pin vs 15-Pin Architecture & Troubleshooting

    Technical Support · Published: June 11, 2026 · Updated: June 11, 2026 · Word count: 2615 · Reading time: 15 minutes

    Semi-Trailer Electrical Systems Guide: 7-Pin vs 15-Pin Architecture & Troubleshooting

    Jason, Lead Engineer at Kales Vehicle

    Reviewed by Jason
    Lead Engineer, Kales Vehicle

    For most export semi-trailers, the real connector choice is not about counting pins. It is about deciding whether the trailer only needs basic lighting circuits or whether it also needs reversing lamps, rear fog lamps, auxiliary electrical functions, and cleaner integration with modern tractor electrical systems. Choose the wrong standard and the result is not only annoying lighting faults. It can mean mismatched adapters, repeated roadside repairs, and avoidable downtime across mixed fleets.

    Quick Answer for Fleet Managers

    • 7-pin ISO 1185 / 24N remains the rugged basic-lighting choice for many developing-market trailers where simplicity and roadside repairability matter most.
    • 15-pin ISO 12098 is the better fit for modern export builds because it combines normal and supplementary lighting circuits in one connector and supports a cleaner electrical architecture.
    • Do not use the lighting connector for braking electronics. Trailer ABS/EBS systems require their own dedicated ISO 7638 connector and must not be treated as an extension of the lighting plug.
    • The most common field failure is still a bad ground. Dimming lamps, erratic flash rates, and “all lights go strange when braking” usually point to an earth fault before they point to a bad LED lamp.
    • Harsh-route survival depends on sealing and routing, not only connector type. IP-rated lamps, molded harness branches, and proper chassis clamping matter as much as the plug standard itself.

    The practical export rule is simple: use 7-pin when the trailer only needs basic lighting and easy field service; use 15-pin when the build needs full rear-light coverage and cleaner modern integration; and keep ISO 7638 separate for ABS/EBS braking electronics.

    Critical Safety Rule

    Never try to “borrow” power or data for the trailer braking system from the lighting connector. Even on modern trailers, the lighting plug and the braking-electronics plug are different systems with different safety consequences.

    • Lighting connector: handles road-lighting and auxiliary lighting circuits.
    • ISO 7638 connector: supplies dedicated power and communication support for trailer ABS/EBS.
    • Workshop rule: if a trailer has both lighting and braking-electronics issues, diagnose them as separate circuits before replacing parts.

    What 7-Pin and 15-Pin Actually Mean on a Semi-Trailer

    In export heavy-duty fleets, the connector decision usually sits between the older ISO 1185 24N 7-pin system and the newer ISO 12098 15-pin system. The older system was built around the minimum legal lighting functions needed to keep trailers moving. The newer system was built to reduce connector count and handle a fuller rear-light package in one housing.

    The important practical distinction is this: the 7-pin system is a basic-lighting connector, while the 15-pin system is a broader trailer-electrical connector. That is why 15-pin is usually the better default for new higher-spec trailers, especially when fleets want reverse lights, rear fog, better sealing, and fewer “mystery adapter” problems across mixed tractor units.

    How to Read the Featured Connection Layout

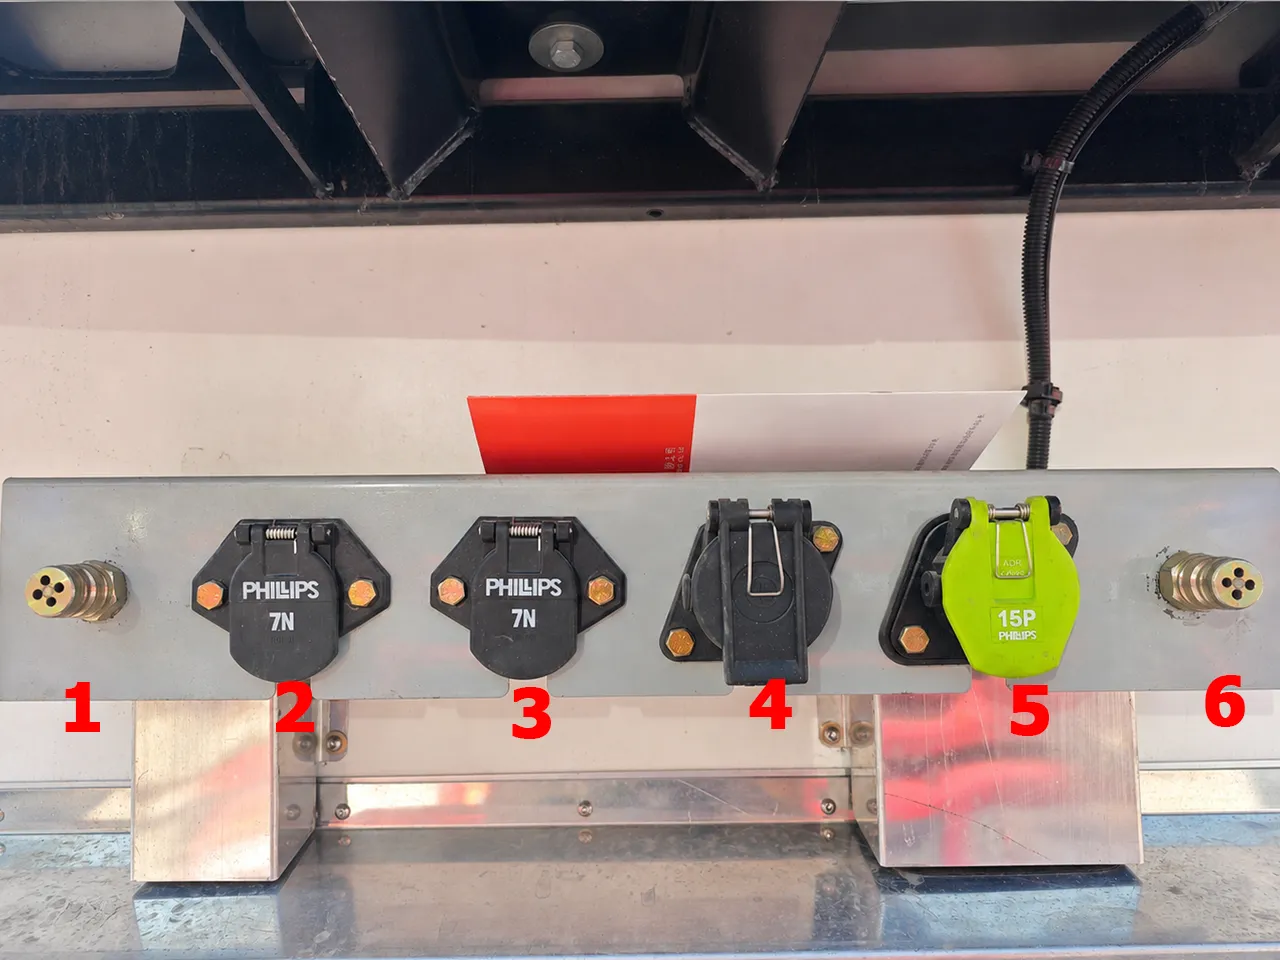
    The featured image on this page shows a typical front connection set used on a KALES refrigerated semi-trailer. The exact socket mix can vary by destination market and tractor matching, but the numbered photo should be read as a functional map, not as six interchangeable connectors.

    1. No. 1 – Supply air line: this line charges the trailer air reservoirs directly and maintains the continuous air source needed for parking-brake release and emergency-brake reserve.
    2. No. 2 – ISO 1185 7-pin main lighting socket: this is the primary road-lighting connector for legally required lamp functions such as turn signals, brake lamps, tail lamps, and marker lamps. It remains the most common heavy-trailer lighting standard across Europe, China, and many export markets.
    3. No. 3 – Supplementary 7-pin auxiliary socket: in older twin-plug 24N/24S layouts, this socket is used for auxiliary electrical functions beyond the basic lighting circuit. On KALES refrigerated trailer builds, it is often reserved for reefer monitoring signals or backup auxiliary power logic.
    4. No. 4 – ISO 7638 ABS/EBS socket: this connector is dedicated to trailer braking electronics. It provides the separate power and communication support required by ABS or EBS and should never be treated as an extension of the lighting plug.
    5. No. 5 – ISO 12098 15-pin 24V socket: this connector combines normal and supplementary lighting functions in one housing and is usually chosen when the trailer needs a cleaner high-spec electrical architecture. On some higher-spec KALES reefer programs, the same front connection package also supports broader tractor-trailer integration such as CAN-based data exchange, refrigeration-status interfaces, TPMS feedback, or reversing-assist expansion, depending on market specification.
    6. No. 6 – Service / control air line: this line transmits the driver’s brake-pedal signal to the trailer control valve so the trailer braking force follows the tractor braking command.

    The practical takeaway from the image is straightforward: Nos. 2, 3, and 5 handle lighting or auxiliary electrics, No. 4 belongs only to ABS/EBS, and Nos. 1 and 6 are pneumatic lines rather than electrical connectors. That separation is exactly why 7-pin, 15-pin, and ISO 7638 should never be treated as interchangeable in workshop practice.

    Standard What it usually covers What it does not replace Best-fit operating profile
    ISO 1185 7-pin (24N) Basic trailer lighting such as turn, stop, tail, and marker logic Supplementary lighting often needs a second connector; ABS/EBS still stays separate Basic flatbeds, tippers, skeletal trailers, and mixed-road fleets that prioritize simplicity
    ISO 12098 15-pin Normal plus supplementary rear-light circuits in one connector, with cleaner support for modern trailer electrics ABS/EBS still requires ISO 7638; it is not a substitute for braking-electronics wiring Modern export trailers, ADR-minded fleets, and higher-spec combinations running newer tractors
    ISO 7638 Dedicated trailer braking-electronics power and communication support It is not a lighting connector and should not be used to power rear lamps Any trailer with ABS or EBS

    7-Pin vs 15-Pin: Functional Difference That Matters in the Workshop

    The classic 7-pin system remains common because it is easy to understand, easy to repair, and widely familiar in workshops from East Africa to Central Asia. If the trailer only needs basic lighting and the fleet already carries common 7-pin suzi coils, it still does the job well enough.

    The limitation is that the 7-pin system was never designed to be the clean answer for every modern rear-light function. Once a trailer needs supplementary circuits, more disciplined waterproofing, or smoother compatibility with newer tractors, the 15-pin system becomes easier to defend technically and commercially.

    Functional Coverage Comparison

    Electrical need 7-pin 24N 15-pin Field implication
    Basic stop / tail / turn lighting Yes Yes Both systems can support standard highway trailer lighting.
    Supplementary rear-light circuits such as reverse or rear fog Usually needs extra connector logic Integrated more cleanly in one plug 15-pin reduces adapter confusion and duplicate connector maintenance.
    Single-plug higher-spec lighting architecture No Yes 15-pin is easier to manage on modern higher-spec trailer builds.
    ABS/EBS braking-electronics support No No Use ISO 7638 separately every time.

    Workshop note: do not rewire by memory or by color alone. Exact pin assignment should always be confirmed against the tractor and trailer wiring documentation, especially in mixed fleets or regional crossover setups.

    Where ISO 7638 Fits and Why It Must Stay Separate

    The most common misunderstanding in mixed export fleets is assuming that “more pins” means the lighting connector can also handle trailer braking electronics. That is incorrect. If the trailer uses ABS/EBS braking control, the system should use a dedicated ISO 7638 connector for power and braking-electronics support.

    This separation matters because lighting faults and braking faults behave differently, fail differently, and carry completely different risk levels. A bad tail-lamp ground is an inconvenience and a legal risk. A compromised ABS/EBS feed can remove anti-lock or stability-support function from the trailer. For that reason alone, lighting and braking circuits should never be merged in workshop improvisations.
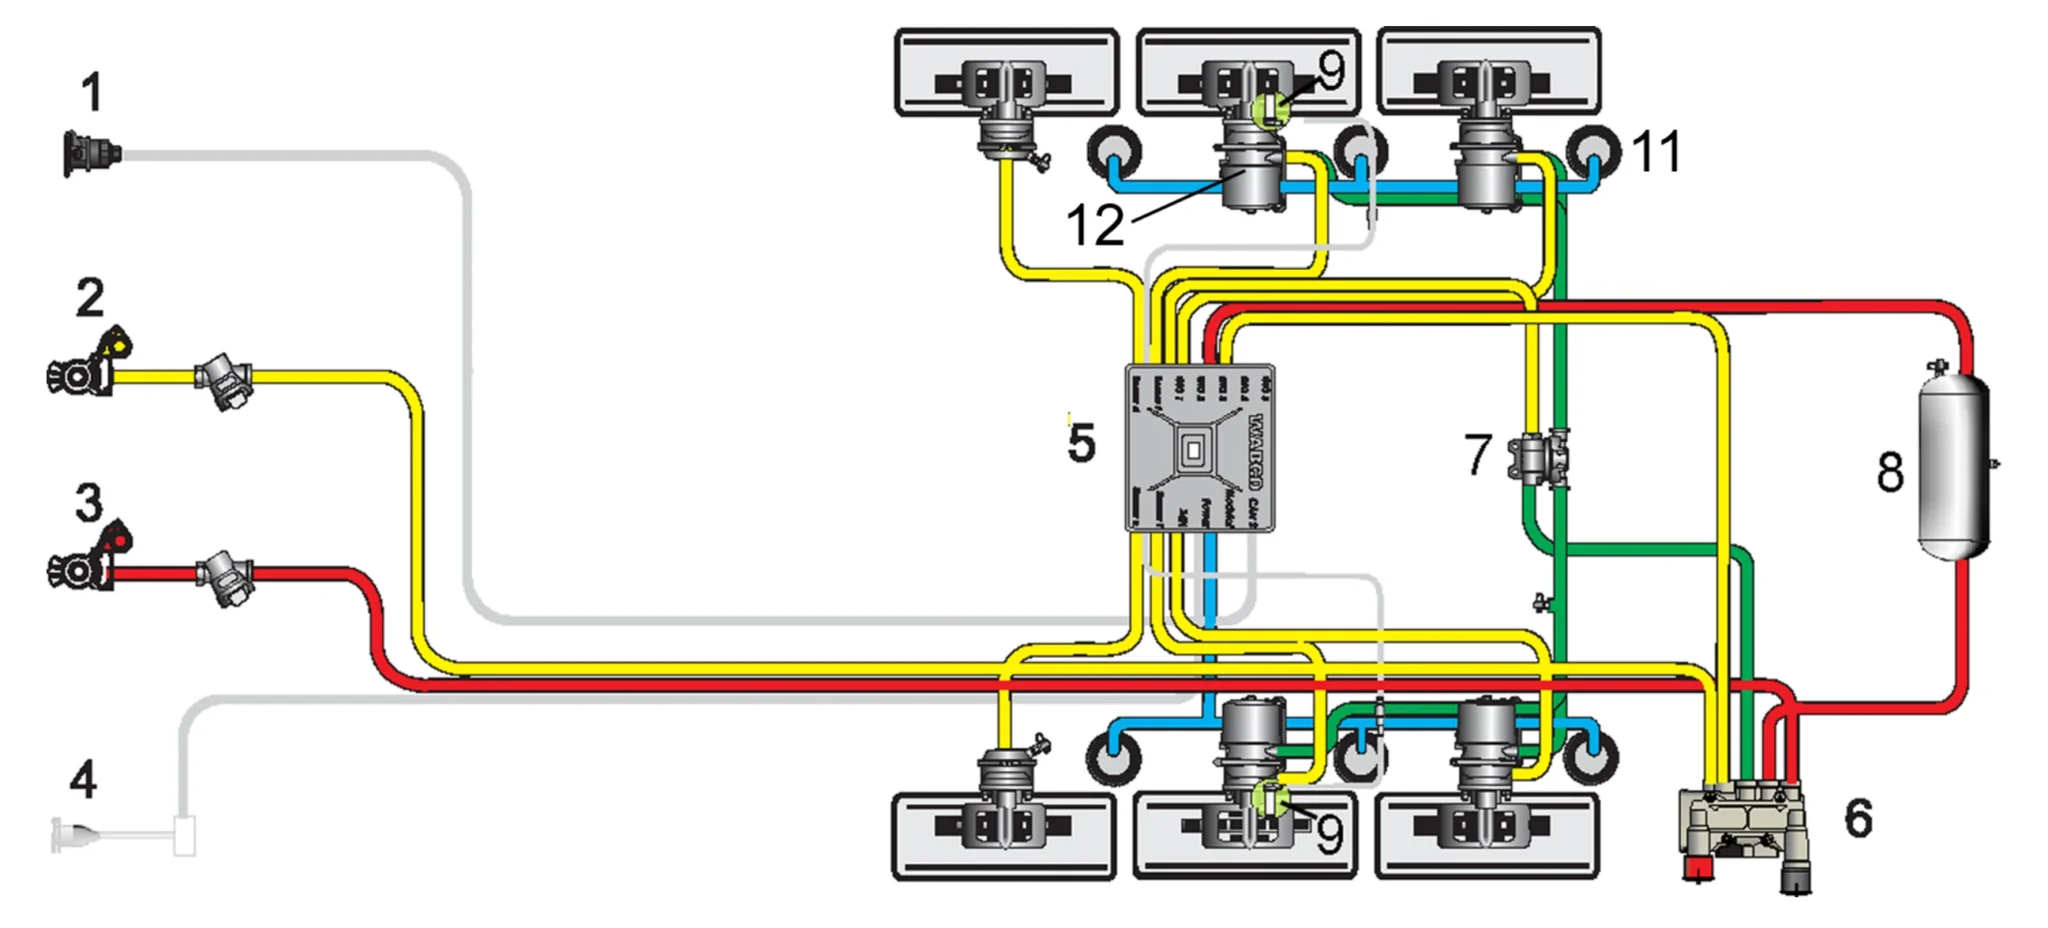
    Semi-trailer schematic showing ISO 7638 power supply separated from normal trailer lighting and braking pneumatics.
    On modern semi-trailers, ISO 7638 is treated as a dedicated braking-electronics feed, not as an extension of the normal lighting connector.

    Regional Compatibility Traps Fleets Should Check Before Shipment

    Connector failures in export markets are often caused before the trailer reaches the road. The real problem is usually standard mismatch: one side of the combination expects one connector logic, the other side expects another, and the workshop tries to solve the difference with a low-quality adapter or improvised rewiring.

    Australia is a common example because fleets may encounter 12V and 24V crossover situations plus local pin-function expectations that do not align cleanly with a European trailer specification. The right answer in those cases is not guesswork. It is a confirmed crossover solution, proper voltage adaptation where needed, and a documented tractor-trailer electrical check before dispatch.

    Pre-Shipment Electrical Compatibility Checklist

    • Confirm whether the tractor fleet is standardized on 7-pin, 15-pin, or mixed connectors.
    • Confirm whether supplementary rear-light functions are mandatory in the destination market.
    • Confirm whether the tractor and trailer both use 24V or whether voltage adaptation is needed.
    • Confirm that the trailer has a separate ISO 7638 plug if ABS/EBS is specified.
    • Confirm whether the fleet expects direct connection or will depend on adapters in daily service.

    Why IP Rating and Harness Design Decide Real-World Uptime

    On rough export routes, connector standard alone does not keep the lights working. Water intrusion, vibration, and abrasion usually kill the system first. That is why the lamp IP rating, harness branching method, and chassis routing standard matter as much as whether the trailer uses 7-pin or 15-pin.

    Component choice Minimum acceptable logic When to upgrade further
    Rear LED lamps IP67 highway-duty sealing Move to IP68 or IP69K for mining, flooded roads, or frequent pressure washing
    Main chassis harness Molded branch points and sealed connectors Avoid taped or open-splice repairs on high-humidity routes
    Suzi coil / spiral cable Correct length, no catwalk drag, no overstretch at full articulation Replace at first sign of sagging, cracking, or intermittent light faults
    Chassis routing Clamp every 500 mm to 600 mm and protect pass-through points Add rubber grommets and abrasion sleeves anywhere the loom crosses steel edges

    The Most Common Trailer Lighting Failure Is Still a Bad Ground

    Across working fleets, the number-one electrical fault is not a failed LED board. It is a bad ground path. If the tail lamps dim when the brake lamp comes on, if one turn signal makes another lamp glow weakly, or if the flash rate becomes erratic only under load, the first suspect is the earth connection.

    This is especially common on older repairs where the ground eyelet was bolted over paint, corrosion, or contaminated chassis metal. A poor ground raises circuit resistance and creates cross-feed behavior that makes the lamps look “haunted” even though the lamp assemblies themselves are still good.

    Fast Diagnostic Sequence for Trailer Electrical Faults

    Field symptom First check Second check / do not assume first
    All rear lamps are dead Connector seating, tractor output, main ground continuity Then inspect suzi coil damage and fuse logic before replacing lamp units
    Lights dim when braking Main earth path and chassis ground point Then inspect corrosion inside the connector body and branch connectors
    Turn signal flashes erratically Ground quality and connector pin contact Then isolate trailer-side lamp load versus tractor-side flasher logic
    Fault only appears in rain or after washing Connector sealing and branch-splice moisture ingress Then inspect lamp IP rating and cracked cable jackets
    Fault happens only on full articulation Spiral cable stretch, broken internal conductor, connector strain Then inspect catwalk drag damage and routing length mismatch

    Top 3 Maintenance Practices That Prevent Most Lighting Downtime

    1. Clean and re-seat the ground path first: if the trailer has weird combined-light behavior, remove corrosion and ensure the ground eyelet bites into clean bare metal.
    2. Inspect the suzi coil every service cycle: if the coil sags, cracks, or rubs on the catwalk, replace it before intermittent faults become total failure.
    3. Secure the harness properly: clamp the loom at regular intervals and protect every pass-through point so vibration cannot cut the insulation.

    When Fleets Should Prefer 15-Pin Over 7-Pin

    Specify 15-pin when the trailer program already includes higher-spec lighting, newer Euro-oriented tractors, or fleet rules that prioritize clean standardization over lowest first cost. In practice, this often applies to tanker fleets, hazardous-goods-minded programs, refrigerated or high-spec dry vans, and export buyers who do not want to live with a second supplementary connector.

    Specify 7-pin when the trailer is intentionally basic, the service environment is rough, and the fleet values mechanical simplicity above all else. Many flatbeds, tippers, and skeletal trailers still fit that logic well, especially when the workshop must keep equipment running with minimal specialized parts.

    Frequently Asked Questions

    Can I run a modern trailer on a 7-pin connector if it only needs basic lights?

    Yes, if the trailer truly only needs basic lighting circuits and the fleet accepts that supplementary functions may require extra connector logic. The decision becomes risky only when the operating requirement quietly grows beyond what the basic connector was chosen to support.

    Can I use the 15-pin lighting connector instead of ISO 7638 for ABS/EBS?

    No. The lighting connector and the ABS/EBS connector serve different functions and different safety priorities. Trailer braking electronics should stay on their dedicated ISO 7638 circuit.

    Why do my trailer lights dim or flash strangely when I hit the brakes?

    The most common cause is a bad ground connection. Check the main earth point, connector corrosion, and ground continuity before replacing lamp bodies or rewiring the whole rear harness.

    When should I treat a trailer electrical fault as a harness problem instead of a lamp problem?

    If the fault appears only in rain, only during articulation, or affects multiple lamps at once, suspect the harness, connector body, or ground path before blaming a single LED fixture.

    What should I send if I need remote electrical troubleshooting support?

    Send the tractor connector type, trailer connector type, voltage, photos of the plug faces, a short video of the symptom, and photos of the chassis ground point and spiral cable. That usually shortens diagnosis much faster than describing the fault by phone.

    Our Final Recommendation

    For most export fleets, 7-pin still makes sense when the trailer is deliberately basic and the workshop values easy roadside repair. But for new higher-spec trailers, 15-pin is usually the cleaner long-term choice because it simplifies supplementary lighting and reduces connector sprawl. In both cases, the non-negotiable rule stays the same: keep ABS/EBS on its own ISO 7638 connector, and treat the ground path as the first diagnostic point whenever lighting behavior becomes erratic.

    Need help choosing the right trailer electrical specification?

    Send your trailer type, destination market, tractor connector standard, voltage, and whether the build needs reverse lights, rear fog, or ABS/EBS integration. The KALES engineering team can recommend the practical connector and harness package before production.
    WhatsApp Us Email Inquiry

  • Semi-Trailer Air Brake Troubleshooting: ABS/EBS, Emergency Valves & Leak Guide

    Semi-Trailer Air Brake Troubleshooting: ABS/EBS, Emergency Valves & Leak Guide

    Technical Support · Published: June 7, 2026 · Updated: June 9, 2026 · Word count: 4260 · Reading time: 24 minutes

    Semi-Trailer Air Brake Troubleshooting: ABS/EBS, Emergency Valves & Leak Guide

    Jason, Lead Engineer at Kales Vehicle

    Reviewed by Jason
    Lead Engineer, Kales Vehicle

    On a semi-trailer, every newton of stopping force is supplied by the tractor through two coupling lines and then stored, amplified, and released by the trailer’s own pneumatics. If the brake chambers cannot hold reserve air, the ABS/EBS controller (5) cannot deliver it fast enough, or the quick release valve cannot dump it cleanly, a fully laden trailer can fail to build – or fail to release – its brakes.

    Quick Answer for Fleets

    • Semi-trailer air brake troubleshooting should start at the red and blue coupling heads, then move inward to the trailer valve (Release Emergency Valve), brake chambers, ABS/EBS controller (5), quick release valve, and brake chambers.
    • The ABS/EBS controller (5) feeds stored air from the brake chambers into the active braking components near the axles; the quick release valve exhausts chamber air locally so the trailer releases without delay.
    • UNECE Regulation No. 13 makes response time, breakaway braking, and stored-air reserve performance mandatory, not optional refinements.
    • The most common trailer-side faults are leaking gladhands, water-contaminated brake chambers, sticking relay or quick release valves, and damaged brake-chamber diaphragms.
    • If a trailer charges slowly, drags after release, or fails a response-time test, inspect the brake chambers, Release Emergency Valve, ABS/EBS controller (5), quick release valve, and condensate drain before replacing chambers at random.

    Critical Safety Protocol & Required Tools

    A fully charged semi-trailer air brake system operates at up to 10 bar (145 psi). Never loosen fittings on a pressurized system. Before beginning any troubleshooting:

    • Chock the wheels: Secure the trailer mechanically, as draining the air will apply the spring brakes.
    • Drain the reservoirs: Pull the manual drain valves (lanyards) on the storage chambers (8) to release all pressure before unbolting any valve.

    Bring the right tools: Do not guess air pressure by the sound of a hiss. You will need:

    • A 0-12 bar (0-175 psi) inline pressure gauge with gladhand adapters.
    • Commercial leak detection spray (more reliable than dish soap).
    • A 24V multimeter or test light (for ABS/EBS power checks).

    How a Semi-Trailer Brake Circuit Actually Works

    Semi-trailer air brake troubleshooting is easier when you think in a fixed chain: tractor supply and protection – coupling heads (2)(3) – Release Emergency Valve (6) – storage brake chambers (8) – ABS/EBS controller (5) – brake chambers (12) – quick release valve (7). Pressure build problems happen upstream in supply and storage; release problems usually happen downstream at the relay, quick release, or chamber side.

    Typical semi-trailer 2S/2M ABS system schematic showing ISO 7638 power supply, service and supply lines, ABS/EBS controller, valves, brake chambers, wheel speed sensor, suspension air bag, and spring brake chamber.
    Fig 1: Typical Semi-Trailer 2S/2M ABS System Schematic
    1. ISO 7638 Power Supply 2. Service Line (Control) 3. Supply Line 4. Stop Light Power (ISO 1185, Optional) 5. ABS/EBS controller 6. Release Emergency Valve 7. Quick release valve 8. Storage brake chambers 9. ABS Speed Sensor 11. Suspension Air Bag 12. Brake chambers
    Note: In this diagram, the ABS/EBS controller already integrates the relay-valve delivery function. Please troubleshoot based on the actual installation of your vehicle model.
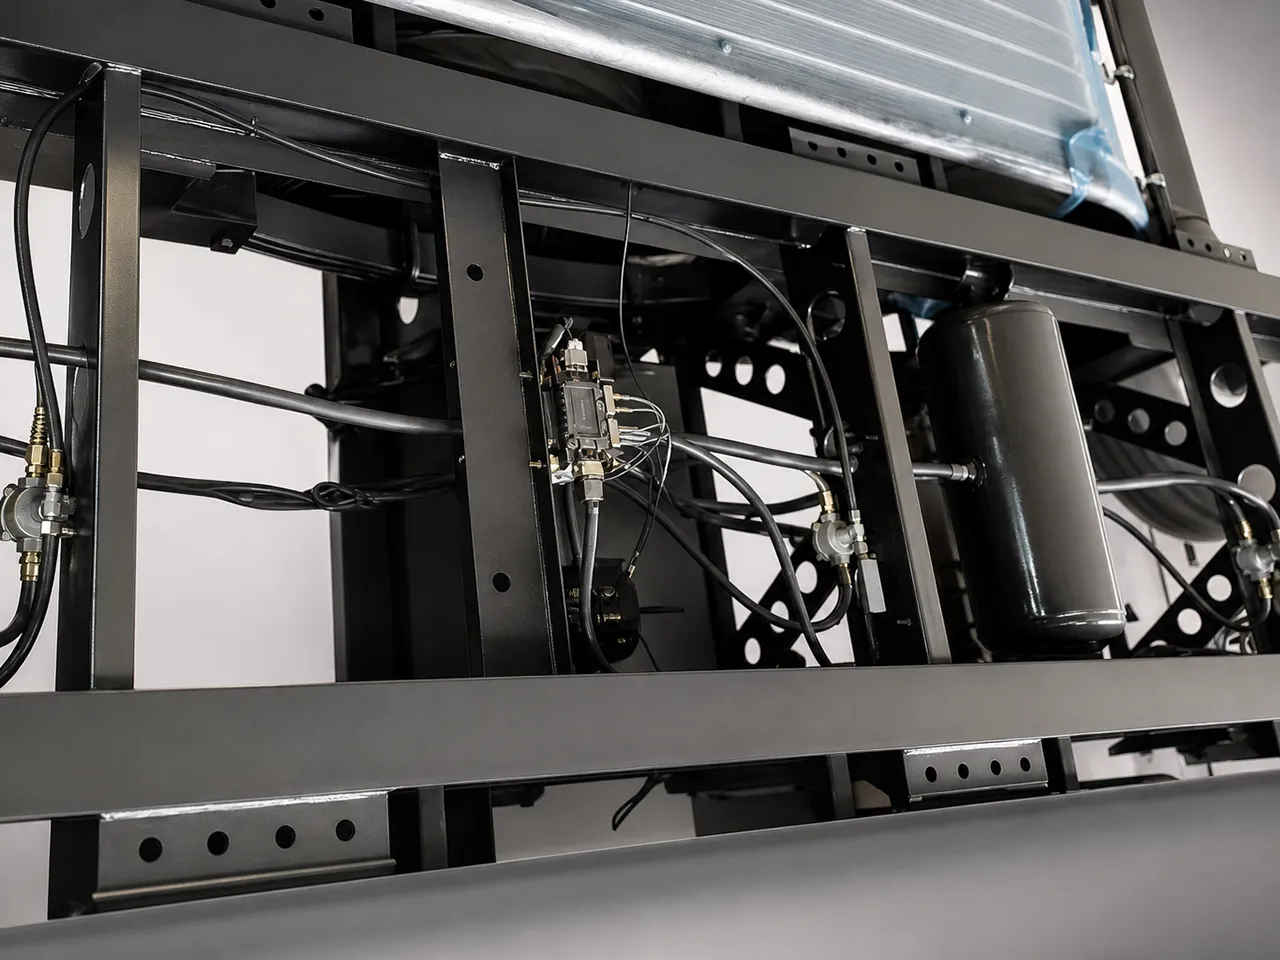
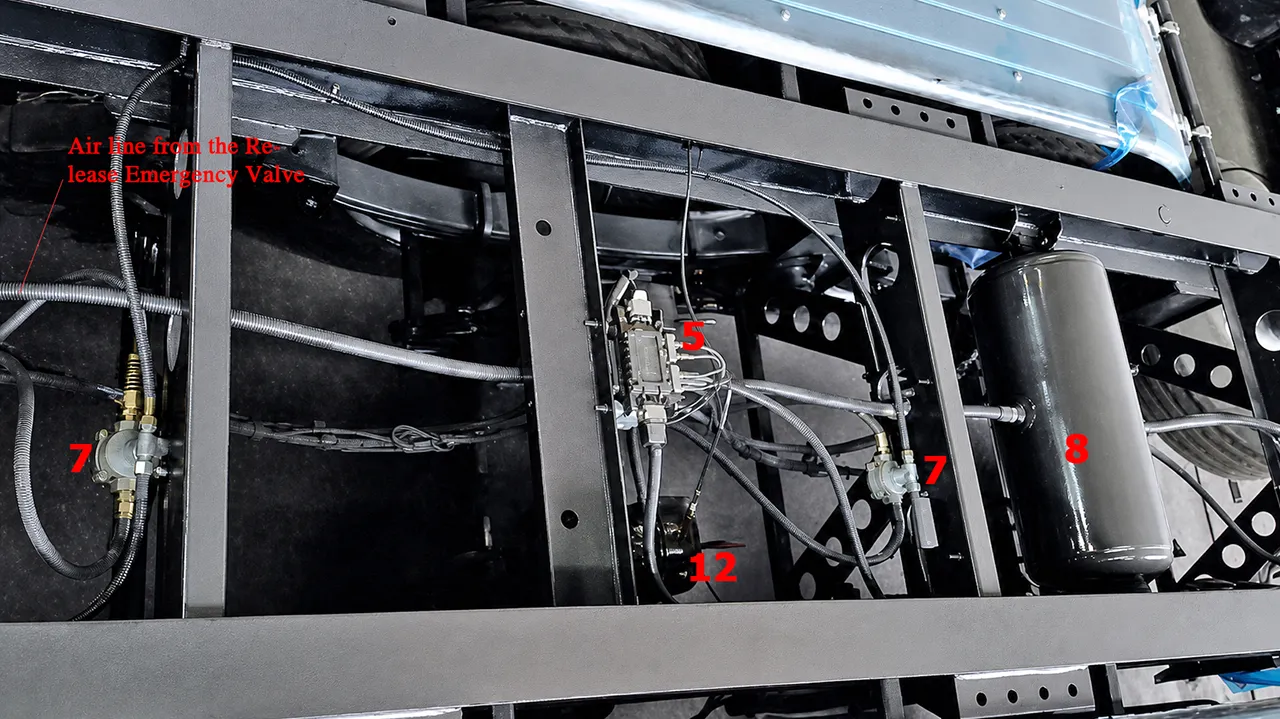
    Annotated real photograph of a semi-trailer axle air brake system, identifying the exact locations of the ABS/EBS controller, Release Emergency Valve, quick release valve, brake chamber, and sensor cable.
    Fig 2: Real-World Semi-Trailer Brake Component Location Guide
    Annotated field photo showing where the ABS/EBS controller, Release Emergency Valve, quick release valve, brake chamber, and sensor cable sit on an actual semi-trailer axle group. Use it to match the schematic to the hardware before you start disconnecting lines or replacing valves.

    Unlike a rigid truck, a semi-trailer has no compressor of its own. The trailer braking system is connected to the tractor via two specific coupling heads: one for supply pressure (3) and one for control pressure (2). The red supply line (3) charges the trailer’s brake chambers and keeps the emergency side alive, while the blue control line (2) carries the service-brake signal.

    The Release Emergency Valve (6) acts as the central hub, transmitting the control pressure to the ABS/EBS controller (5). The Release Emergency Valve is equipped with two primary controls: a red operating button to actuate the parking brake, and a black operating button to release the brakes, a function that is automatically triggered when the trailer is uncoupled. Compressed air from the storage brake chambers flows through a non-return valve integrated within the Release Emergency Valve and enters the ABS/EBS controller (5).

    Inside the trailer, supply air fills the storage brake chambers (8). When the driver brakes, the signal reaches the ABS/EBS controller (5), which controls the service brake components of the brake chambers (12). The system utilizes at least two ABS wheel speed sensors (9) to monitor wheel rotation. For maintenance, the pneumatic extension module also features a pressure test port to measure actual braking pressure.

    To apply the parking brake, the operator presses the red button on the Release Emergency Valve. This exhausts the compressed air from the parking brake component of the brake chambers, allowing the internal springs to actuate the wheel brakes. If the service brake is simultaneously used, braking pressure flows through the anti-compounding valve into the parking component. This offsets the spring force in proportion to the service braking force established, ensuring that the two forces do not compound and cause mechanical overload on the wheel ends.

    Component Logic: Standalone Relay Valve vs. Integrated EBS Modulator

    System layout What you will usually find on the trailer What it means for troubleshooting
    Conventional pneumatic ABS trailer Separate relay/emergency valve, quick release valve, chambers, and ABS hardware Follow the air path component by component and test each valve body independently.
    TEBS / EBS trailer with integrated modulator ABS/EBS controller often combines electronic control, pressure modulation, and relay delivery logic Do not search for a separate relay valve if the modulator already performs that job. Confirm the exact hardware layout first.
    Mixed fleet workshop reality Older trailers may use separate valves while newer export builds use integrated controllers Start every diagnosis by identifying the installed modulator or valve assembly from the nameplate and air-line routing.

    The Three Primary Working States of the Trailer Brake System

    To fully understand the troubleshooting process, we must recognize the three direct working states of the system:

    1. Normal Braking (Service Brake State): This is the most direct function we feel. When the brake pedal is pressed, the blue control line (2) sends air. The Release Emergency Valve (6) controls the delivery of air from the storage chambers (8) to the active brake chambers (12), generating braking force. When the pedal is released, the Release Emergency Valve (6) rapidly exhausts the compressed air from the chambers, quickly releasing the brakes.
    2. Charging Process (Feedback Braking State): If a trailer has been parked for a long time and the system has no air pressure, the spring parking brakes are active. When the tractor begins charging the trailer’s storage chambers (8) via the red supply line (3), the Release Emergency Valve (6) enters a safe braking state. In this safety state, the Release Emergency Valve initially sends compressed air directly into the brake chambers. Only when the pressure in the storage chambers (8) rises above 4.5 bar is this safety state released. This feedback braking function ensures the trailer generates braking force while charging, serving as a critical safety protection.
    3. Emergency Disconnect (Automatic Braking State): If the supply line (3) is accidentally damaged or disconnected, the compressed air stored in the trailer’s chambers (8) flows through the Release Emergency Valve (6) directly into the brake chambers (12). This automatically executes braking measures to ensure the vehicle’s safety in an emergency. This is the same principle you observe when the tractor intentionally disconnects the supply line when parking.
    Working state What has pressure What the mechanic should observe
    Charging state Supply line (3), storage chambers (8), release circuit Trailer should progressively come off spring parking force as storage pressure rises. If not, check supply, PREV logic, and trapped parking pressure.
    Service braking state Control line (2), ABS/EBS controller (5), brake chambers (12) Brake application should be even and fast across the axle group. Late build-up points to controller delivery, weak supply, or local leakage.
    Emergency or breakaway state Stored air routed by Release Emergency Valve (6) Trailer must self-brake when the red line is lost. If it does not, stop operation and inspect the emergency valve path immediately.

    Trailer Storage and the UNECE R13 Reserve Rule

    A trailer’s air storage within the brake chamber system is not just a tank. Under UNECE Regulation No. 13 for category O trailers, the trailer must keep braking even if the supply line is interrupted. In practice, that means the brake chambers, protection logic, and Release Emergency Valve must preserve enough usable air to keep the service brake effective after repeated applications.

    Annex 7 defines the reserve by performance, not just by volume: after four full-stroke service applications with no recharging, the system must still be able to apply the brake a fifth time and deliver at least 50% of the prescribed service braking performance. For North American buyers, the FMVSS No. 121 shorthand is different but points to the same engineering logic: the trailer air storage volume must be at least eight times the combined volume of the service brake chambers (12) fed by that source.

    In simple fleet terms, usable reserve depends on three things: storage volume, charge pressure, and air consumed per application. More volume and more usable pressure window give the trailer more stored stops. Higher leakage, chamber over-travel, or repeated full-pressure applications consume the reserve much faster.

    ABS/EBS controller (5) vs. Quick Release Valve: Why Trailer Response Lives or Dies Here

    On a semi-trailer, the ABS/EBS controller (5) and the quick release valve are not optional refinements. They are the components that let the trailer meet legal response-time behaviour.

    What the ABS/EBS controller (5) does

    The ABS/EBS controller (5) converts a relatively small control signal into a large, local flow of stored air from the brake chambers (8) into the active chambers (12). Without it, the trailer would have to wait for chamber fill through a longer and more restrictive air path, which slows actuation and reduces response consistency axle to axle.

    What the quick release valve does

    The quick release valve exhausts chamber air directly to atmosphere near the axle instead of sending that air back through the longer upstream path. This is why a healthy trailer releases cleanly and why a damaged quick release valve often shows up as dragging brakes, slow release, or hot drums/discs after a short road move.

    Why the standards care about speed

    UNECE R13 Annex 6 turns “fast enough” into a real pressure-time requirement. The response-time method uses a nominal 650 kPa input signal, with the reference signal rising linearly from 0 to 650 kPa in 0.2 s plus or minus 0.01 s. The trailer-side actuator pressure then has to build from 65 kPa to 490 kPa within the defined response interval. A sticking ABS/EBS controller (5), weak local supply, leaking chamber feed, or damaged quick release valve is one of the most common reasons a trailer fails this kind of test.

    Coupling Lines, Breakaway Protection, and Why Red-Line Faults Are Critical

    The most safety-critical trailer behaviour is automatic braking on breakaway or supply-line failure. If the red line is lost, the trailer must not simply coast free. The trailer valve (Release Emergency Valve) has to detect supply-line evacuation and trigger the emergency or spring-brake side quickly enough to stop the trailer from running away.

    UNECE R13 clause 5.2.1.18.4 makes that behaviour explicit. When the supply line is evacuated at at least 100 kPa per second, automatic trailer braking must start before supply-line pressure falls to 200 kPa. When the designated control is fully actuated, supply-line pressure must fall to 150 kPa within two seconds. This is the formal basis for why cross-coupled lines, leaking gladhands, or a seized Release Emergency Valve are not small housekeeping issues – they directly compromise breakaway protection.

    Inspection item Requirement or threshold How to read it in the workshop
    Stored-air reserve Fifth application still delivers at least 50% braking performance after four full-stroke applications If the trailer goes soft after repeated applications, suspect insufficient reserve in the brake chambers (8), excessive leakage, or bad protection logic.
    Response signal 0 to 650 kPa in 0.2 s plus or minus 0.01 s Slow trailer response usually points to the ABS/EBS controller (5), feed, contamination, or valve-seat issues rather than a tractor complaint alone.
    Actuator build-up 65 to 490 kPa chamber build in the defined response window If local chamber pressure rises late, inspect ABS/EBS controller (5) delivery and flow path first.
    Breakaway start point Automatic braking begins before supply-line pressure falls to 200 kPa If the trailer does not self-brake on a red-line loss simulation, stop using it until the Release Emergency Valve and supply side are checked.
    Supply-line drop on full actuation Pressure falls to 150 kPa within 2 s Slow evacuation suggests the wrong plumbing behaviour, sticking valve internals, or contamination.
    FMVSS 121 trailer air sizing At least 8 x combined service brake chamber volume North American fleets can use this as a quick sizing check when comparing brake chambers (8) and chamber packages.

    Where Trailer Air Systems Usually Leak

    Start with the system charged and the trailer brake applied. Work from the coupling heads inward and use a soap-bubble test on every suspect point. The loudest hiss is not always the true failure point, because sound can travel along pipe runs and cross-members.

    Leak or fault location Typical symptom Most likely root cause
    Red or blue coupling heads / gladhands Trailer will not charge, or spring brakes will not release Worn seals, crossed couplings, damaged gladhand faces, or hose-end damage
    Brake chambers (8) drain valve or tank shell Pressure falls while parked; water drains heavily; rust flakes appear Worn drain seal, trapped condensate, internal corrosion, or pitted shell
    ABS/EBS controller (5) or quick release valve exhaust Leak at the exhaust port; slow release; hot brakes after release Damaged seat, contamination, aged diaphragm, or sticking spool
    Brake chambers (12) Pressure loss on application; one axle drags or under-brakes Punctured diaphragm, pushrod over-travel, or damaged clamp / housing
    Trailer relay-emergency valve (Release Emergency Valve) No breakaway braking; poor charge behaviour; unstable release logic Corrosion, frozen internals, distorted diaphragm, or supply-side contamination

    Fast Diagnostic Sequence by Symptom

    Field symptom First check Second check / do not assume first
    Trailer charges slowly Gladhands, red/blue line routing, tractor supply pressure Then inspect Release Emergency Valve and storage chamber leakage. Do not start by replacing axle-end hardware.
    Trailer drags after release Quick release exhaust and residual chamber pressure Then inspect ABS/EBS controller return, hose collapse, and slack-adjustment condition.
    One axle runs hot Compare chamber stroke and release timing axle to axle Then inspect S-cam, return springs, and local hose restriction. Do not blame the lining set first.
    Trailer will not move after parking Confirm black release button position and charging pressure Then isolate electrical lockup vs. trapped parking pressure vs. seized mechanical brake hardware.
    Breakaway function fails Stop service and inspect red-line logic immediately Focus on Release Emergency Valve, emergency path, and supply-side evacuation behaviour before routine wear items.

    Mobile Field Checklist

    1. Trailer charges slowly: Check gladhands, red/blue line routing, and tractor supply pressure before moving to the Release Emergency Valve and storage-side leakage.
    2. Trailer drags after release: Check quick release exhaust first, then look for trapped chamber pressure, ABS/EBS controller return issues, or a collapsed hose.
    3. One axle runs hot: Compare chamber stroke and release timing across axles before replacing drums, linings, or other friction parts.
    4. Trailer will not move after parking: Confirm the black release button is in the release position and verify that charging pressure is actually reaching the trailer.
    5. Breakaway function fails: Stop operation and inspect red-line evacuation logic, Release Emergency Valve behavior, and the emergency air path immediately.

    Use this list for phone-side field checks, then return to the full table when you need the second-step diagnostic path.

    Semi-Trailer Air Brake Troubleshooting by Symptom

    Now that we understand the structure, let’s look at actual, common faults in the field. Semi-trailer brake faults generally manifest as air leaks, dragging, or locking up.

    1. Air pressure remains below 0.7 MPa for long periods, or the trailer experiences obvious brake dragging

    How to resolve:

    1. Rule out the tractor: Swap the tractor unit with another one to completely rule out tractor-side air compressor or delivery faults.
    2. Soap bubble test: Use soapy water to pinpoint the leak source. Methodically check and eliminate leaks at gladhand connections, pipe joints, cross-leaking inside brake chambers, emergency relay valve exhaust ports, and ABS valve exhaust ports.
    3. Inspect for water/rust contamination: If the leak persists, check if the trailer valve bodies have water ingress or obvious rust. If this occurs, it indicates poor filtration and drying effects from the tractor’s air line. The internal seals are likely compromised, and you may need to replace the valve body.

    2. Trailer is completely locked up after parking and cannot start/move

    How to resolve:

    1. Isolate the electrical circuit: First, unplug the ABS spiral cable to see if the trailer can start normally. This rules out electrical or ECU-related lockup issues.
    2. Verify tractor supply: Ensure the tractor is in a pumping/charging state. Disconnect the air pipe at the hand control valve and check if the output pressure is normal. The pressure should be high during the charging state.
    3. Check Release Emergency Valve status: Confirm that the parking brake is actually in the released state. The black button on the Release Emergency Valve should be pushed in.
    4. Mechanical inspection: If the air circuit checks out fine with no issues, you must ultimately inspect the axles for internal mechanical faults, such as seized S-cams or broken return springs.

    3. Trailer brakes apply but release slowly

    This is classic quick release valve territory. A blocked exhaust, sticky diaphragm, or contaminated valve seat can keep chamber air trapped after the control signal drops. Also inspect the ABS/EBS controller (5) exhaust behaviour; a relay function that does not return cleanly can mimic a quick release fault.

    4. One axle runs hotter than the others

    Do not assume friction hardware first. Compare chamber stroke, local hose condition, and release timing on that axle. A local ABS/EBS controller (5) or quick release problem can keep one axle partially applied even when the rest of the trailer releases normally.

    Common Misdiagnoses to Avoid

    • Dragging brakes do not automatically mean the quick release valve is bad. A collapsed hose, seized S-cam, or over-stroked chamber can create the same symptom.
    • Low system pressure does not automatically mean the ABS/EBS controller has failed. Start with tractor supply, gladhands, drains, and contamination first.
    • A hot axle does not automatically mean friction parts are undersized. Compare pressure build and exhaust timing before replacing drums, discs, or linings.
    • An ABS or EBS warning lamp does not automatically mean the pneumatic side is healthy or unhealthy. Electrical faults and air faults can overlap but they are not the same diagnosis.
    • Replacing chambers repeatedly without checking upstream wet air usually treats the symptom, not the cause.

    Why Moisture and Contamination Destroy Trailer Valves First

    Many valve failures originate upstream in moisture and contamination brought in from the tractor. Water and oil entering the trailer’s brake chambers (8) corrode seats, seize spools, harden diaphragms, and freeze in cold weather. That is why the condensate drain, clean coupling heads, and routine inspection matter more than many fleets realize.

    If a fleet keeps replacing ABS/EBS controller (5) units and quick release valves without addressing wet air and tank contamination, the new parts will fail the same way again. Clean, dry supply air is the foundation of the entire trailer circuit.

    The Fleet Manager’s Preventative Maintenance (PM) Schedule

    To avoid emergency breakdowns and extend the life of your ABS/EBS controllers and valves, integrate this simple checklist into your fleet’s routine:

    Interval Action Item Why it matters
    Daily / Pre-Trip Pull the reservoir drain valves (lanyards) for 3-5 seconds. Expels overnight condensation before it reaches the ABS/EBS controller. If white or yellow emulsion comes out, the tractor’s air dryer is failing.
    Weekly Inspect red and blue gladhand seals. Worn seals cause slow system charging and can trigger false breakaway braking.
    Monthly Perform a brake application and release timing test. Listen for the crisp exhaust of the quick release valve. Sluggish exhaust means the valve diaphragm is sticking.
    Annually Replace the tractor’s air dryer cartridge. Crucial for trailers: many trailer valve failures are caused by oil and water blow-by from a neglected tractor compressor system.

    What to Send Your Supplier or After-Sales Team

    If you need remote support, the fastest way to avoid guesswork is to send a short but complete fault package:

    • Trailer type, axle count, and whether it uses ABS only or TEBS/EBS.
    • Nameplate photos of the ABS/EBS controller or emergency valve assembly.
    • The exact symptom: slow charging, dragging, full lockup, one hot axle, or failed breakaway test.
    • Whether the issue affects one axle, one side, or the whole trailer.
    • Pressure readings taken at the supply line, control line, reservoir/test port, and chamber side if available.
    • Photos or short video of the plumbing layout, valve exhaust behaviour, and warning lights.

    Sources and Technical Basis

    • UNECE UN Regulation No. 13, Rev.8, Amend.11 – trailer braking performance, response time, and reserve-air requirements.
    • 49 CFR 571.121 (FMVSS No. 121) – trailer reservoir sizing, brake-chamber volume rule, and trailer-side air brake equipment requirements.
    • KALES field inspection practice – soap-bubble leak checks, condensate drain inspection, and trailer-side response diagnostics.

    Frequently Asked Questions

    What is the difference between an ABS/EBS controller (5) and a quick release valve on a semi-trailer?

    The ABS/EBS controller (5) delivers stored air quickly into the brake chambers. The quick release valve dumps chamber air locally so the brakes release quickly. One feeds the chambers; the other exhausts them.

    Why does a trailer charge normally but drag after the driver releases the brake pedal?

    The most common causes are a sticking quick release valve, an ABS/EBS controller (5) that does not return cleanly, or a brake chamber (12) or slack-adjustment problem that keeps one axle partially applied.

    How should I troubleshoot a trailer that will not build pressure?

    Start at the gladhands, hoses, and coupling seals. Then inspect the drain valve on the brake chambers (8), tank condition, Release Emergency Valve, and upstream protection logic. Do not jump straight to chamber replacement unless the leak clearly appears during brake application.

    What does the FMVSS 121 reservoir rule mean in plain terms?

    For trailers, each service reservoir, part of the brake chambers (8) system, must have a total volume of at least eight times the combined volume of the brake chambers (12) it serves. It is a simple way to check that the trailer stores enough usable air for safe braking.

    Why is a leaking red-line coupling more serious than a normal service leak?

    Because the red line is the supply and emergency side. If that path is compromised, the trailer may fail to charge correctly or fail to trigger the automatic braking behaviour required during breakaway or supply-line loss.

    Final Recommendation

    If a trailer will not build pressure, respond on time, or release cleanly, the right troubleshooting order is supply line, Release Emergency Valve, storage chambers, ABS/EBS controller, quick release valve, and brake chamber. For builders and fleet buyers, the engineering lesson is simple: stored-air capacity, emergency protection logic, local delivery, and local exhaust are one system. Underspec or neglect any part of that chain and the trailer will eventually show it under load.

    Get Diagnostic Help for Your Trailer Brake System

    If your trailer is charging slowly, dragging after release, locking after parking, or failing emergency-line behaviour, send the axle configuration, valve nameplate photos, pressure readings, and symptom video. KALES can help you narrow the fault path before you replace high-cost components blindly.

    WhatsApp Us Email Inquiry

  • Bulk Powder Tanker Trailer Guide: Cement Bulker Operation and Maintenance

    Bulk Powder Tanker Trailer Guide: Cement Bulker Operation and Maintenance

    Published: November 2, 2025 | Last updated: May 30, 2026

    In the heavy transport industry, efficiency is king. Whether you call it a pneumatic dry bulk trailer, a cement bulker, or a “silobas,” choosing the right equipment and operating it correctly is crucial for profitability. As a leading manufacturer exporting to Africa, Latin America, and Central Asia, Kales Vehicle Co., Ltd. presents this comprehensive guide to mastering your bulk powder tanker semi trailer.


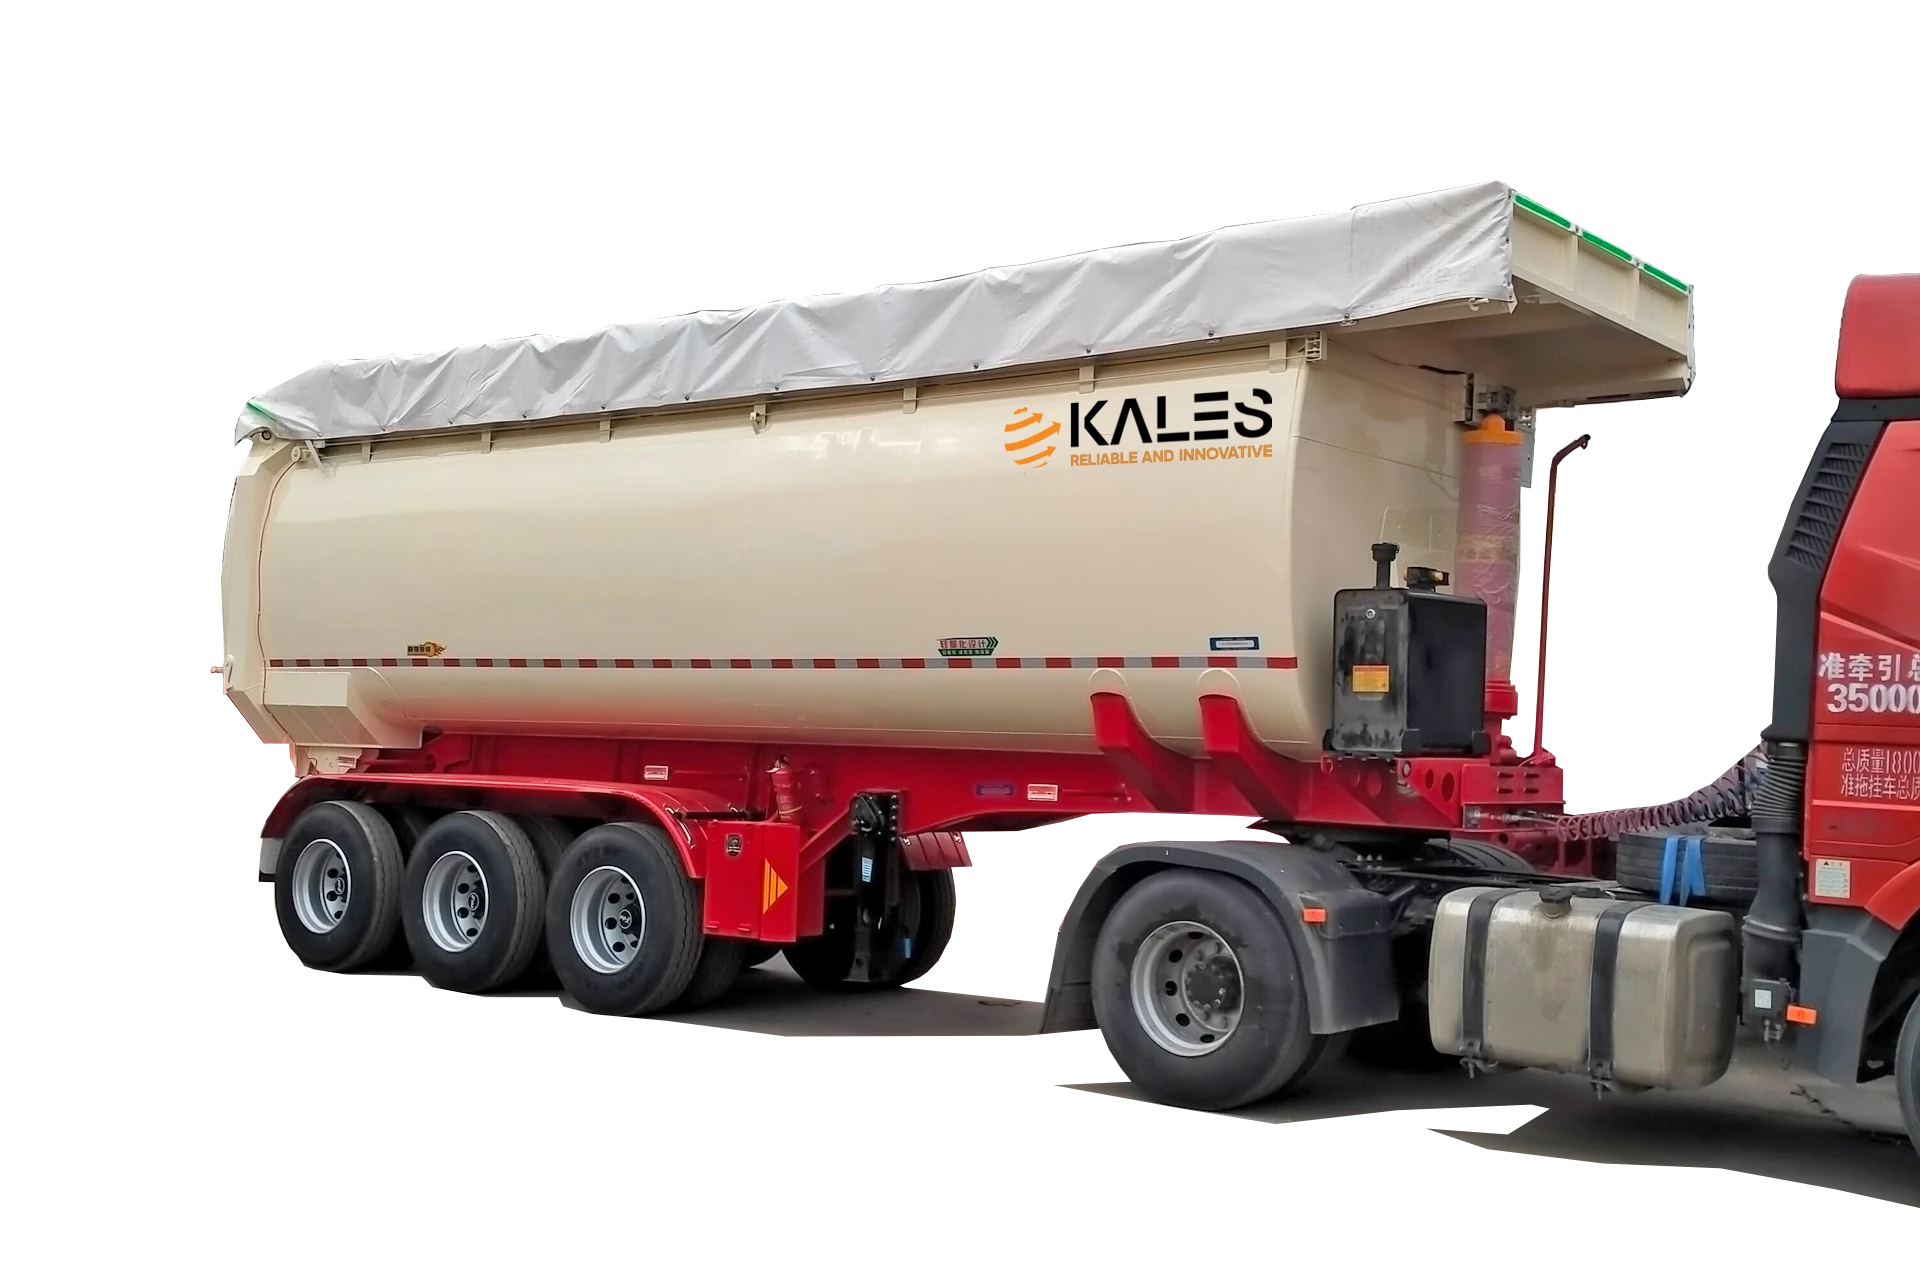
    4-Compartment 58m³ Powder Tanker trailer 58CBM Bulk Powder Transport trailer for sale
    Kales 3-axle bulk powder tanker semi trailer for cement transport ready for export.

    Technical basis and scope

    How this powder tanker guide is supported

    This guide is based on Kales dry bulk tanker specification practice, the operating data already shown in the article, and common pneumatic conveying principles used for cement, fly ash, lime powder and similar dry bulk materials. The key operating references are the Kales working-pressure range around 0.20 MPa, compressor speed range of 850-1000 RPM, fluidization canvas thickness of 6.5-8.0 mm, and typical unloading speed of 1.2-1.5 tons/minute when site conditions are suitable.

    The safety basis is wider than trailer specification. Public references such as HSE pressure systems guidance, OSHA compressed-air requirements, NIOSH Portland cement exposure data, and OSHA crystalline silica guidance support the same practical rule: control pressure, dust, moisture and stored energy before any hose is opened or any blockage is cleared.

    Use the numbers as ordering and maintenance references, not as permission to exceed the tank nameplate, relief-valve setting, compressor manual or local pressure-vessel rules. Before purchase, confirm cargo type, moisture sensitivity, unloading distance, silo height, local repair capability, tractor PTO compatibility, road condition, operator PPE and spare-parts availability.

    1. Why Choose Kales Pneumatic Dry Bulk Trailers?

    Designing trailers for rough terrain requires more than just steel; it requires engineering precision. Kales trailers are built to withstand the harsh road conditions of mining regions while delivering high-speed unloading.

    • ⚡ Fast Unloading Speed: Achieves 1.2–1.5 tons/minute, significantly reducing waiting time at the construction site.
    • 📉 Ultra-Low Residue: Our advanced fluidized bed design ensures a residue rate of <0.1%, saving you material costs on every trip.
    • 🛠️ World-Class Components: We use globally trusted brands for easy maintenance:
      • Diesel Engines: Reliable Weichai engines for consistent power.
      • Air Compressors: High-performance Bohai or Suzhou compressors (12m³ dual-cylinder).
      • Braking: Genuine WABCO braking systems for safety.
    • 🌍 Reinforced Chassis: Specially strengthened sub-frames and suspension systems designed for African and Central Asian road conditions.

    2. Selecting the Right Bulk Tanker Configuration

    Choosing between a V-shape, Cone-shape, or Tipper depends entirely on your cargo.

    🚛 Type A: Horizontal “V-Shape” Cement Trailer

    Best for: Cement, Fly Ash, Lime Powder.

    • Pros: Low center of gravity provides superior stability on highways. Simple internal structure allows for large capacity (up to 85m³).
    • Cons: Not suitable for coarse materials that don’t fluidize well.

    🚀 Type B: Vertical “Cone” Tanker

    Best for: Granules, Fertilizer, Coarse materials.

    • Pros: Gravity-assisted discharge ensures clean unloading of heavier particles.
    • Cons: Higher center of gravity requires careful driving on curves.

    4-Compartment 58m³ Powder Tanker trailer 58CBM Bulk Powder Transport trailer for sale

    🆙 Type C: Tipper (Lift-Type) Powder Tanker

    Best for: Food-grade Flour, PTA, Pharmaceutical Powders.

    • Pros: Zero residue makes it ideal for hygiene-sensitive cargo. Easy to clean internally.
    • Cons: Requires a flat, stable site for lifting to prevent tipping over.


    Buyer selection matrix: match tank design to cargo behavior

    The right dry bulk trailer is chosen by how the material flows, not only by cubic capacity. Cement and fly ash usually need a low-residue fluidized bed; fertilizer or granules may need cone discharge; food-grade or chemical powder may need lift-type cleaning access.

    • Cement and fly ash: choose a V-shape cement bulker when highway stability, high volume and controlled pneumatic discharge matter most.
    • Fertilizer, pellets and coarse powder: consider a cone tanker when gravity-assisted discharge is more important than the lowest possible center of gravity.
    • Food-grade flour, PTA or hygiene-sensitive powder: use a lift-type tanker only when the unloading site is flat, stable and trained for tipping operation.

    3. Power Source: Diesel Engine vs. PTO

    When ordering your Kales cement trailer, you must decide how to power the air compressor.

    Feature Independent Diesel Engine PTO (Power Take-Off)
    Flexibility High. Works with ANY truck head. Ideal for logistics companies with mixed fleets. Low. Must be paired with a specific truck head equipped with a PTO gearbox.
    Weight Heavier (Adds approx. 500kg). Lighter (Saves fuel during empty return trips).
    Maintenance Requires separate engine oil/filter changes. Low maintenance (uses truck engine power).


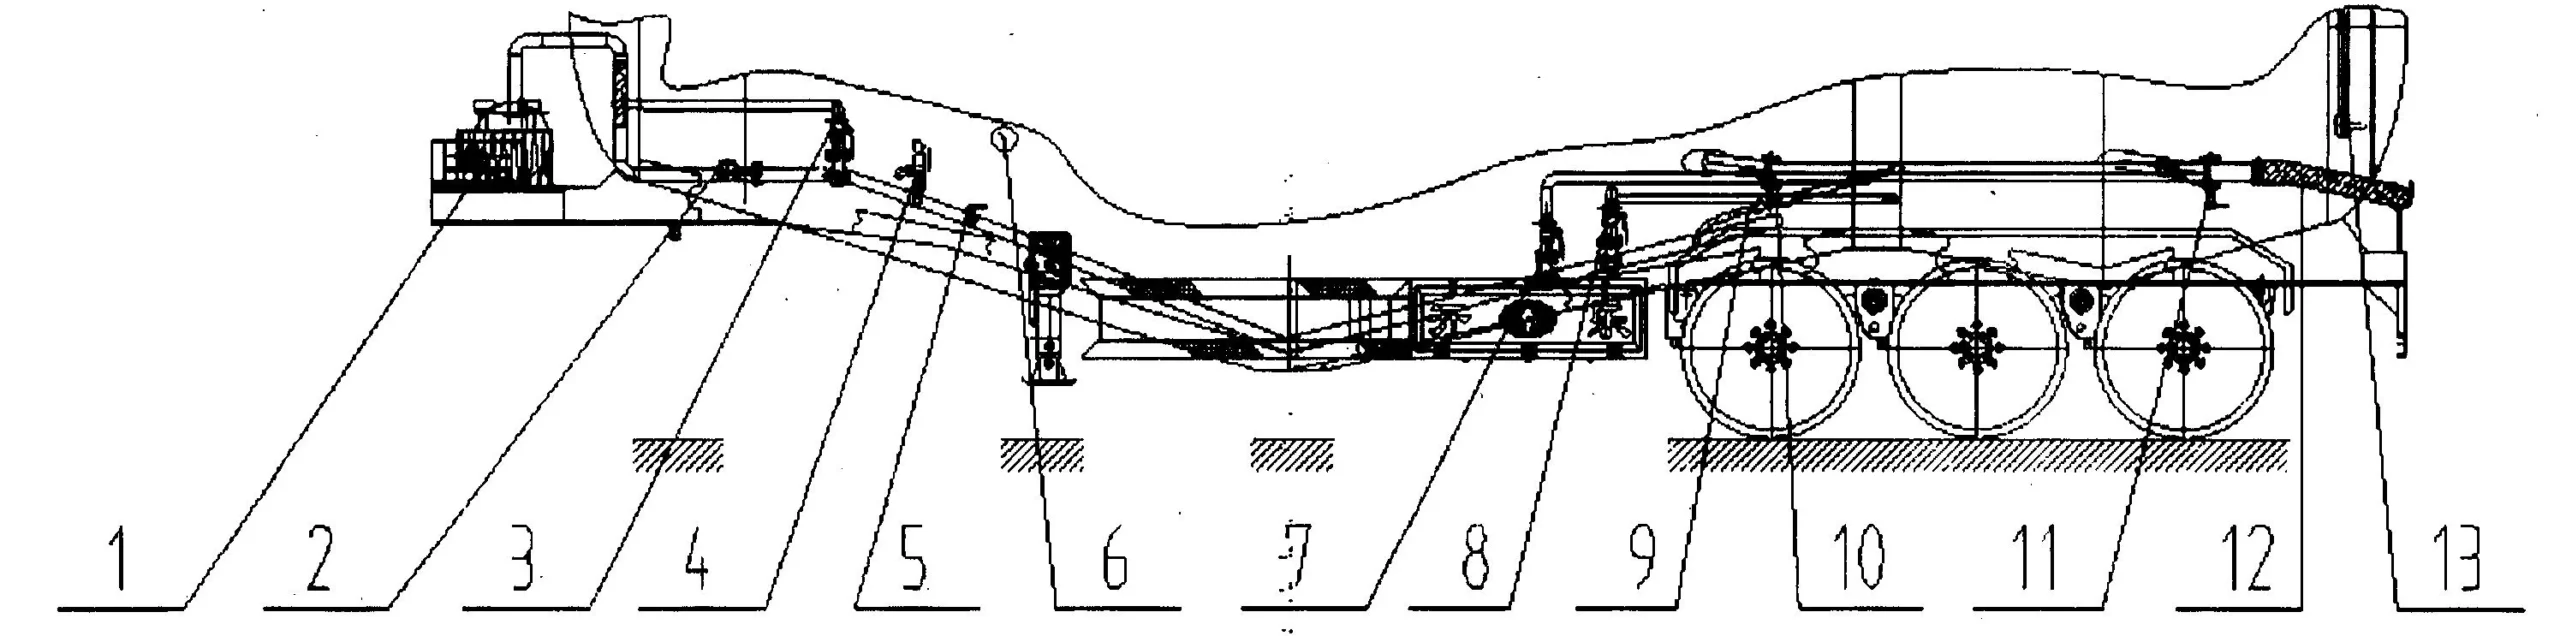
    Pneumatic Conveying System Schematic

    1. Air Compressor、2. Check Valve、3. Front Air Chamber Inlet Valve、4. Safety Valve (0–0.3 MPa)、5. External Air Source、6. Pressure Gauge、7. Middle Air Chamber Inlet Valve、8. Rear Air Chamber Inlet Valve、9. Secondary Blow Valve、10. Front Compartment Discharge Butterfly Valve、11. Rear Compartment Discharge Butterfly Valve、12. Discharge Hose

    4. Standard Operating Procedure (SOP) for Safe Unloading

    Follow this step-by-step guide to ensure safety and prevent damage to the fluidization canvas.

    ⚠️ Critical Safety Rules

    MOISTURE WARNING: Never allow water into the tank or air lines. Wet cement creates concrete blockages that can ruin the tank.
    PRESSURE HAZARD: Never open the manhole cover while the pressure gauge reads above 0 MPa.

    Step 1: Start-Up

    1. Connect the discharge hose to the silo inlet securely.
    2. Close the Pressure Relief Valve and Discharge Butterfly Valve. Open the Air Inlet Valves.
    3. Start the Weichai diesel engine.
    4. Adjust the hand throttle to the rated RPM. (Target: Keep Air Compressor at 850–1000 RPM. Do not over-rev!)
    5. Wait until tank pressure builds to 0.2 MPa.

    Step 2: Unloading

    1. Open the Secondary Blow Valve (Assist Valve) to clear the discharge pipe.
    2. Slowly open the main Discharge Butterfly Valve.
    3. Monitor the pressure. If it drops rapidly, the tank is emptying.

    Step 3: Cleaning & Shutdown

    1. When pressure drops to 0.15–0.10 MPa, alternate opening and closing the front/rear inlet valves. This “sweeping” action clears residue.
    2. Stop the engine. Open the pressure relief valve to release all remaining air before disconnecting hoses.

    5. Troubleshooting: How to Unblock a Cement Tanker Pipe

    A clogged discharge hose is a nightmare for drivers. If your pressure gauge spikes (>0.25 MPa) and discharge stops, follow this emergency procedure.

    The “Pulse” Technique (Emergency Unblocking)

    1. STOP: Do not increase the throttle; this will pack the powder tighter.
    2. CLOSE: Close the main Discharge Butterfly Valve.
    3. BLAST: Open the Secondary Blow Valve fully to blast air through the hose.
    4. PULSE: Quickly open and close the Discharge Butterfly Valve. The sudden pressure bursts often dislodge the blockage.
    5. MANUAL: If this fails, stop the engine, release ALL pressure, and physically check the rubber hose. A hard section indicates the clog.

    6. Fluidization Bed System Technical Explanation

    The core of a dry bulk tanker is its fluidization bed, which converts solid, static powder into a dynamic, liquid-like state. Without fluidization, dry cement behaves like dense sand, bridging over the outlet and locking inside the hopper. Understanding the mechanical components of this system is essential for troubleshooting discharge speed drop-offs.

    6.1. Fluidized Bed Architecture

    The interior floor of the V-shape tanker is sloped at a 40-degree angle, converging toward a central discharge trough. The trough is covered by a multi-layer fluidization fabric (commonly referred to as the fluidization canvas or slide belt). Below this canvas is the air chamber plenum box.
    The air compressor pumps dry air at 0.2 MPa (2.0 Bar) into this lower plenum. The air forces its way upward through the woven canvas, creating thousands of micro-jets. These air jets penetrate the cement powder, spacing the cement particles apart and reducing their friction coefficient to zero, allowing the fluidized cement to flow down the slope like water.

    6.2. Canvas Material and Weave Specifications

    Kales utilizes premium polyester-cotton composite slide belts (thickness: 6.5mm to 8.0mm). The fabric must possess exact air permeability specs (typically 2.0 to 3.5 m³/m²·min at 1.0 kPa pressure drop).
    If the canvas weave is too loose, the air passes through in big bubbles without fluidizing the cement, and powder can sift backward into the air chamber when the tank depressurizes. If the weave is too tight, it restricts airflow, resulting in slow unloading and increased compressor heat.


    7. Tank Operating Pressure Safety & Over-Pressurization Hazards

    A pneumatic dry bulk tanker is a certified Class II pressure vessel. Operating a pressurized vessel carries high safety risks, requiring mechanical safety relief valves and pressure gauges to prevent catastrophic tank ruptures.

    7.1. Pressure Limits and Relief Valve Calibration

    • Standard Working Pressure: 0.20 MPa (2.0 Bar / 29 PSI)
    • Max Operating Pressure: 0.22 MPa (2.2 Bar / 32 PSI)
    • Hydrostatic Test Pressure: 0.30 MPa (3.0 Bar / 44 PSI)
    • Safety Relief Valve Crack Pressure: Calibrated to open at 0.23 MPa to 0.25 MPa.
    ⚠️ Safety Warning: Relief Valve Maintenance
    Cement dust inevitably migrates into the safety relief valve spring mechanism. Over time, this dust reacts with moisture, forming concrete that locks the safety valve shut. Operators must manual-test the safety pull-ring weekly to ensure the spring moves freely. A locked safety valve can cause a catastrophic over-pressure explosion if the compressor limit is exceeded.

    8. Moisture Prevention & Air Dryer Maintenance

    Moisture is the absolute enemy of pneumatic bulk transport. When high-pressure air is compressed, its relative humidity spikes, leading to condensation. If water droplets enter the tank, they react with cement or fly ash, forming hard lumps of concrete that block the canvas pores, requiring manual chiseling to clean.

    8.1. Pre-Loading and Loading Protocols

    • Daily Compressor Purge: Before starting the Weichai engine, open the water drain cock at the bottom of the air compressor reservoir tank to purge condensed water.
    • Silo Vent Inspections: Ensure the loading hatch seals are clean and the rubber gasket is intact. Worn gaskets allow rainwater to enter the tank during transit.
    • Silo Air Supply: Ensure the silo’s receiving pipe is dry. If loading hot cement (above 80°C) during humid weather, condensation will form on the cool steel tank walls. In this case, the tank should be discharged immediately after arrival.

    9. Blower (Compressor) Calibration and Maintenance

    The air compressor is the engine of the unloading process. Kales tankers use high-performance Bohai or Suzhou 12m³ twin-cylinder reciprocating piston blowers or rotary screw compressors. Proper belt tension, speed calibration, and lubrication are vital to prevent premature wear.

    9.1. Speed and Belt Calibration

    The compressor must rotate within its target speed range of 850 RPM to 1000 RPM.

    • Under-speeding (<800 RPM): Insufficient airflow fails to fluidize the cement, causing pipe blockages and doubling discharge time.
    • Over-speeding (>1100 RPM): Generates excessive heat (discharge air temperature exceeding 140°C), which will melt the polyurethane lining of the discharge valves and scorch the fluidization canvas.
    • V-Belt Tension: Measure belt deflection. Pressing the belt midway between pulleys should yield 15mm to 20mm of deflection. Loose belts slip, reducing compressor speed and overheating the pulleys.

    9.2. Lubrication and Air Filter Maintenance

    • Oil Changes: Replace compressor gear oil after the first 50 operating hours, and every 500 hours or 6 months thereafter. Use high-performance ISO VG 150 gear oil.
    • Air Filters: Clean the compressor intake air filters weekly. In dusty mining areas, filters clog rapidly, starving the compressor of air and causing the cylinders to overheat.

    Export fleet note: Africa, Latin America and mining routes

    For export fleets serving cement plants, port terminals, mines and remote construction sites, the main failure pattern is not usually the tank shell. It is moisture entering the air system, clogged fluidization fabric, loose suspension fasteners, worn discharge seals or a compressor running outside its correct RPM range.

    If the route includes unpaved roads, steep access roads or long waiting time before unloading, specify spare fluidization canvas, discharge hose, butterfly valve seals, air filters, pressure gauges, safety-relief valve parts and compressor belts with the trailer order. These low-cost parts reduce downtime when the nearest workshop is far from the job site.

    Pre-delivery checklist before first loading

    • Pressure system: verify gauge reading at zero, safety valve test movement, manhole gasket condition and all air-line clamps.
    • Compressor system: check oil level, belt deflection, air filter cleanliness and target 850-1000 RPM under load.
    • Fluidization system: confirm canvas is dry, undamaged and evenly fixed before loading cement or fly ash.
    • Road readiness: retighten U-bolts after early service, inspect tank-to-frame rubber pads and keep a record of discharge time for each site.

    10. Maintenance Guide for Rough Roads

    ✅ Chassis & Suspension

    • U-Bolts: Retighten leaf spring U-bolts every 5,000 km. Loose bolts are the #1 cause of suspension failure on dirt roads.
    • Cushion Pads: Inspect the rubber pads between the tank body and chassis. Worn pads lead to metal-on-metal stress cracks.

    ✅ Fluidization System

    • Canvas Life: The breathable belt inside the tank usually lasts 1–2 years. If unloading slows down, replace it.
    • Water Separator: Drain the air compressor tank daily. Moisture is the enemy of the fluidization belt.

    Receiving-Silo Release: Dust, Pressure and Hose Disconnect Control

    Pneumatic unloading is a two-sided operation: the tanker must be ready, and the receiving silo must be able to accept air, powder and displaced dust. Many slow-discharge complaints are not caused by the trailer alone. A blocked silo filter, full bin, closed receiving valve or wet product in the line can raise pressure and push cement dust back toward the operator.

    Use a release check that combines pressure-system discipline and dust exposure control. HSE pressure systems guidance supports inspection of pressurized equipment, OSHA compressed-air requirements are relevant to safe air use, and NIOSH Portland cement data plus OSHA crystalline silica guidance explain why dust exposure should be controlled rather than treated as normal site mess.

    • Before unloading: confirm silo capacity, open receiving valve, working dust collector, secure hose clamps and a clean path around the discharge zone.
    • During unloading: track tank pressure, compressor RPM, hose vibration and dust collector behavior; stop if pressure rises without flow or dust escapes at the silo inlet.
    • Before disconnect: close the discharge valve, keep purge air only as specified, let the line drain, then depressurize the tank and hose to zero before loosening any clamp.
    • Before dispatch: record discharge time, pressure behavior, site name, product type and any moisture or blockage symptom for the maintenance log.

    For fleet control, pair this release record with the Kales semi-trailer maintenance manual and the semi-trailer troubleshooting guide. If discharge time grows at the same site, inspect the silo system before replacing tanker parts.

    Ready to Upgrade Your Fleet?

    Kales Vehicle Co., Ltd. delivers durable, high-performance transport solutions tailored to your market. Contact us today for technical diagrams and a custom quote.

    Get a Free Quote   View Product Catalog

    Need help applying this guide?

    Share your trailer type, payload, routes, operating climate, and photos with Kales. Our team can review the key points from this guide and recommend a practical specification for your fleet.

    1. Send photos of your tractor, trailer, or current component layout
    2. Confirm payload, road conditions, gradients, climate, and duty cycle
    3. Receive a specification or maintenance recommendation within 24 business hours

    Email: [email protected]  |  WhatsApp: +86 131 5638 8843  |  Request a quote

  • Fuel Tanker Semi-Trailer Operation and Maintenance Manual

    Fuel Tanker Semi-Trailer Operation and Maintenance Manual

    Published: October 31, 2025 | Last updated: May 30, 2026

    Foreword: Designed for professional drivers and fleet managers, this manual provides the essential SOPs (Standard Operating Procedures) for the safe operation of Kales Fuel Tanker Trailers. Adherence to these guidelines ensures compliance with international HAZMAT transport regulations.


    Technical basis and safety scope

    How this fuel tanker manual is supported

    This manual is based on Kales export fuel tanker configuration, the API bottom-loading hardware described in the article, and dangerous-goods operating references already used in the text: API RP1004 for bottom-loading couplers, ADR/RID operating concepts, and DOT406 cargo tank concepts for tank integrity, vapor recovery, static grounding and compartment leak testing.

    For external safety context, the guide references OSHA 1910.106 for flammable liquids, PHMSA 49 CFR 178.345 cargo tank specifications, PHMSA 49 CFR 178.346 DOT 406 cargo tank requirements, PHMSA 49 CFR 180.407 cargo tank inspection and testing, and the U.S. CSB Barton Solvents static-spark investigation. These sources support the same field priorities: bonding and grounding, overfill prevention, vapor control, leak testing, compartment integrity and documented inspection.

    The figures in this guide are operating references for trained fleets: P/V vent working pressure around +6 to +8 kPa / -2 to -3 kPa, pneumatic interlock pressure around 0.35-0.5 MPa, grounding continuity below 10 Ohms, and pneumatic leak testing at 35 kPa. Always follow the vehicle documents, terminal rules and local hazardous-goods law for the exact unit.

    1. Core Systems Overview

    1.1 🛢️ Tank Body & Construction

    • Material Standards: High-tensile Carbon Steel (Q345R), Stainless Steel, or Aluminum Alloy (5083). Compliant with ADR/RID and ISO standards for dangerous goods transport.
    • Compatible Media: Gasoline (Petrol), Diesel, Kerosene, and Jet Fuel.ℹ️ Note: For transporting edible oils or specific chemicals, ensure seals (gaskets) and lubricants are food-grade or chemically compatible. Never cross-contaminate without validation.
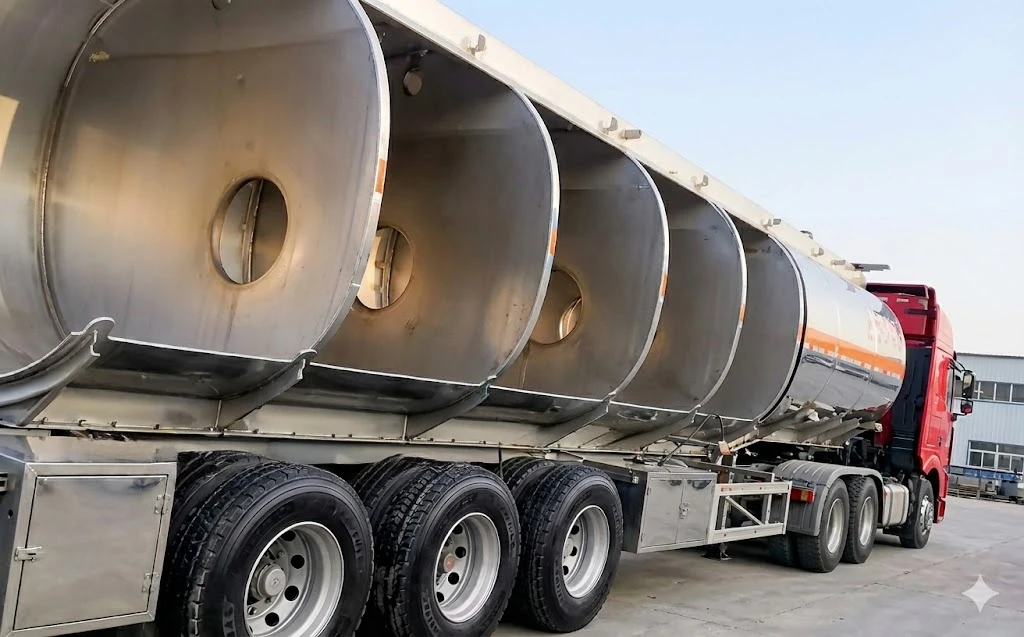
    • Anti-Surge Design: Equipped with internal Baffles (Thickness ≥4mm, flow area >20%) to minimize liquid surge and improve vehicle stability.
    • Capacity: 20,000L – 80,000L, available in Single or Multi-Compartment configurations.
    • Cross-sectional diagram of the bulkheads and baffles in the Kales fuel tank semi-trailer

    1.2 ⚙️ Manhole Assembly (Top Loading System)

    Located on the tank top, the standard Euro-style Manhole (DN500) integrates:

    • Breather Valve (P/V Vent): Dual-mode Pressure/Vacuum relief.
      • Working Pressure: +6~+8 kPa (Pressure) / -2~-3 kPa (Vacuum).
      • Emergency Venting: 21~32 kPa.
    • Safety Interlock: The cover cannot be opened unless residual tank pressure is safe.
    • Overfill Prevention: Integrated with optic/thermistor sensors to trigger high-level alarms and shut off loading automatically.

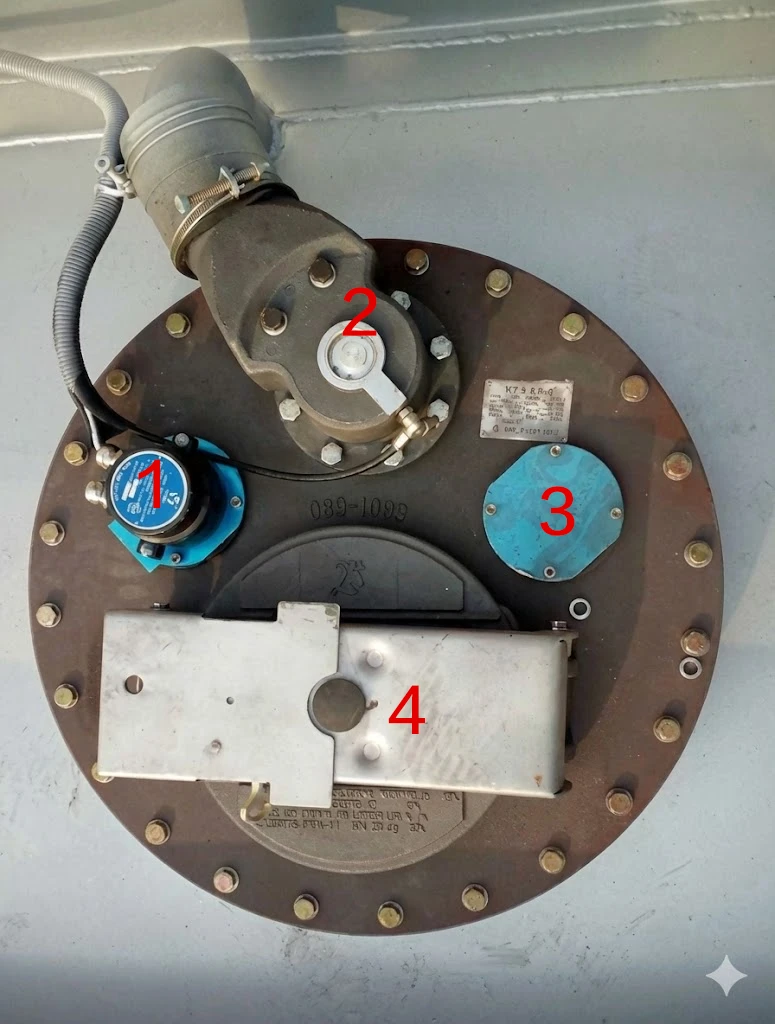
    European-style manhole cover with integrated pressure

    European-style manhole cover with integrated pressure 1.Overfill prevention probe  2.Vapor recovery valve  3.Gauging hatch (or dip tube opening)  4.Manhole cover with integrated Breather Valve and Safety Interlock

    1.3 🔋 Bottom Loading System (API Standard)

    The core system for closed-loop, environmentally friendly loading operations. Fully compliant with API RP1004.

    • Emergency Foot Valve (Internal Valve): Pneumatically operated. Features a shear groove that snaps off during a collision, keeping the tank sealed to prevent spillage.
    • API Adapter Valve: The standard 4-inch valve with a 70° nose angle for dry-break coupling. Uses FKM (Viton) seals for fuel resistance.
    • Vapor Recovery Valve: Interlocked to open with the Foot Valve, returning volatile vapors to the terminal instead of venting to the atmosphere.
    • Pneumatic Control Block: Centralizes control for all valves, including the Master Air Valve.

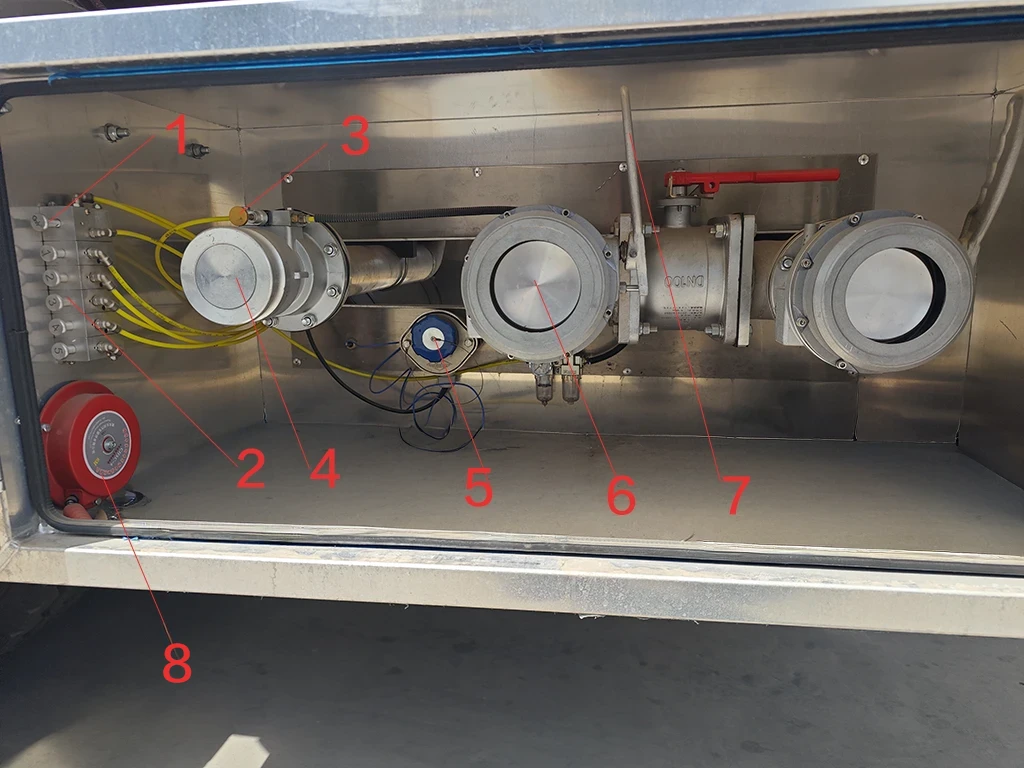
    Valve Box Components Legend:

    1. Master Air Valve: Activates the main pneumatic system.
    2. Compartment Switches: Pneumatic controls for individual Emergency Foot Valves.
    3. Vapor Recovery Switch: Opens the top vents (Interlocked with Master Valve).
    4. Vapor Recovery Valve: Outlet for recovering vapors during loading.
    5. Overfill Prevention Socket: Connection point for the terminal’s anti-overfill monitor.
    6. API Adapter Valve: Standard 4″ connection for bottom loading/unloading.
    7. API Valve Handle: Manually controls the valve opening and flow rate.
    8. Static Grounding Pin & Clamp: Essential connection point for static dissipation.

    2. Standard Operating Procedures (SOP)

    2.1 ⛽ Loading Procedure (Bottom Loading)

    A. Pre-Loading Checks

    1. 🛑 Park & Secure: Engine off, parking brake set, wheel chocks in place.
    2. Static Grounding (CRITICAL): Connect the Bonding Cable to the terminal ground. Ensure the continuity light is green.*Wait 15 minutes after parking for static dissipation before connecting.
    3. 🔄 System Reset: Ensure all valves are closed and the air pressure gauge reads 0.35–0.5 MPa (50-70 psi).

    B. Loading Execution

    1. Connections:
      • Connect Overfill Probe Socket (Ensure no “Wet” alarm).
      • Connect Vapor Recovery Hose.
      • Connect Loading Arm to the API Adapter (Lock securely).
    2. Open Master Air Valve:
      • Action: Pull the “Master” switch.
      • 💡 Function: Engages the pneumatic system and forces the Vapor Vents open to balance tank pressure.
    3. Open Product Line:
      • Actuate the Foot Valve switch for the specific compartment.
      • Manually open the API Valve Handle.
    4. Start Loading: Follow terminal procedures. Monitor the Emergency Shut Down (ESD) button.
    5. Loading Sequence:
      • Recommended: Load evenly (e.g., Center first, or Front/Rear balanced).
      • ⚠️ PROHIBITED: Driving with a full load in only the front or rear compartment (prevents Kingpin/Suspension damage).

    C. Post-Loading Disconnection

    1. Close & Disconnect: Once the pump stops, close the Foot Valve first, then the API Valve. Disconnect hoses.
    2. Final Step: Disconnect the Grounding Cable last.

    2.2 💧 Unloading Procedure (Gravity Drop)

    🛑 DANGER: Vacuum Collapse Warning

    Liquid discharging creates a massive vacuum inside the tank.
    NEVER unload without opening the Master Air Valve (Vapor Vents).
    Failure to vent the tank will cause the tank body to implode (collapse) instantly.

    Execution Steps:

    1. Hose Connection: Connect Vapor Hose (if available) first, then the Discharge Hose.
    2. Equalize Pressure: Open the Master Air Valve.Check: Listen for the “hiss” or mechanical sound of the Vapor Vents opening on top.
    3. Discharge: Open the Foot Valve, then open the Manual Discharge Valve.
    4. Monitor: Never leave the vehicle unattended. Watch the sight glass.
    5. Drain & Finish: Tilt the hose to drain residue into the storage tank. Close valves in order: Foot Valve ➔ Manual Valve. Disconnect hoses.

    2.3 🚛 Special Operations

    🔩 Lift Axle Operation

    • Permitted: Only when the trailer is Unloaded (Empty).
    • Prohibited: NEVER lift the axle when carrying a load.

    ↩️ Self-Steering Axle (Reversing)

    • Procedure: Before reversing, drive forward 3–5 meters to straighten the wheels. Shift into Reverse and ensure the Locking Pin is engaged.
    • ⚠️ Warranty Void: Reversing without locking the steering axle will cause severe damage to the steering mechanism and tires. This is NOT covered under warranty.

    3. API Bottom-Loading Coupling Specifications

    Bottom loading via API couplers is the industry standard for safe fuel transfer. Standardizing these connections ensures that any terminal arm can mate securely without leaking. The Kales bottom-loading suite is manufactured in strict accordance with the API RP1004 specification.
    The API adapter’s profile must be measured periodically to prevent connection failures. Worn adapters will bypass the coupler latch locks, allowing the arm to disconnect under pressure, resulting in high-volume fuel spills.

    Parameter Spec API RP1004 Standard Limit Kales Factory Specification Field Tolerance & Verification Method
    Adapter Nose Diameter 101.6mm (4.000 inches) 101.55mm +/- 0.05mm Discard adapter if diameter measures <100.8mm (3.968″). Measure with caliper.
    Nose Angle / Bevel 70 degrees 70.0 degrees +/- 0.5° Verify profile using a go/no-go gauge. Inspect for nicks on locking lip.
    Max Flow Rating 2,400 L/min (635 GPM) 2,500 L/min Do not exceed loading pressure of 5.0 Bar (72 PSI) at the terminal arm.
    Poppet Leakage Threshold Zero visible leakage <0.05 ml per disconnect Replace Viton seal ring if leakage exceeds 3 drops per disconnect cycle.
    Interlock Air Pressure 0.35 – 0.70 MPa 0.50 MPa (5.0 Bar) Inspect pneumatic logic block pressure gauge. The system must lock out if pressure is <0.30 MPa.

    4. Closed-Loop Vapor Recovery System

    During loading or unloading, fuel vapors (which contain volatile organic compounds, VOCs) must not be vented to the environment. The closed-loop vapor recovery system routes these vapors back to the terminal or storage tank. If this system is restricted, the tank will experience either over-pressurization during loading or structural vacuum collapse during gravity unloading.

    4.1. System Components and Pipe Diameter

    The vapor recovery system starts at the top of each compartment, where a pneumatically controlled vapor vent valve is mounted on the manhole cover. These valves vent into a common 100mm (4-inch) aluminum pipe manifold running along the top of the tank.
    This pipe descends at the front of the trailer, terminating in a 4-inch API vapor adapter valve in the main discharge box. An integrated check valve prevents reverse flow from the terminal. A flame arrestor screen is installed inside the manifold to prevent external ignition sources from travelling into the tank compartments.

    4.2. Condensate Trap Maintenance

    As warm fuel vapors cool inside the vapor pipe manifold, they condense back into liquid fuel. This liquid settles at the lowest point of the vapor recovery pipe, near the bottom discharge valve.
    Required Maintenance: Operators must open the vapor recovery pipe drain valve weekly. If liquid fuel is allowed to accumulate, it will block the airflow, creating high backpressure that triggers the terminal’s emergency shut-off sensor during loading.


    5. Static Grounding & Bonding Verification

    Fuel flowing through pipes generates electrostatic charges. If these charges accumulate on the tank body, they can create a high-voltage spark when a hose or coupling is disconnected, igniting fuel vapors. Static grounding is the single most critical safety protocol during fuel transfer.

    5.1. Grounding vs. Bonding

    • Grounding: Connects the trailer chassis directly to the earth (ground rod) to bleed off accumulated static charge.
    • Bonding: Connects the tractor, trailer chassis, and loading terminal piping together electrically to ensure they are at the same electrical potential, preventing sparks when hoses are connected.

    5.2. Testing Grounding Continuity

    Do not assume the grounding strap is doing its job. Check the electrical resistance of the grounding circuit using this procedure:

    1. Locate the brass grounding pins on the trailer’s front nosebox and the copper grounding strap at the rear.
    2. Set your digital multimeter (DMM) to the Ohms (Ω) scale.
    3. Measure the resistance between the API adapter valve body and the copper grounding strap touching the ground.
    4. The resistance must measure less than 10 Ohms.

    Diagnosis: If the resistance is greater than 10 Ohms, check for paint or rust on the grounding bolt connections. Clean the mounting bolts down to bare metal and re-test. Replace the grounding copper braid if it is frayed or corroded.


    6. Tank Integrity & Compartment Leak Testing Protocol

    To comply with dangerous goods regulations (ADR / DOT406), the structural integrity of the tank shell and individual bulkheads must be tested annually. Leakage between compartments (bulkhead cracks) causes product cross-contamination (e.g., diesel mixing with premium gasoline), which is a severe safety and commercial risk.

    6.1. Pressure Decay Leak Test (Pneumatic Test)

    ⚠️ Safety Warning: Pneumatic Testing
    Never exceed the test pressure of 35 kPa (5.0 PSI / 0.35 Bar) during pneumatic testing. Applying high air pressure to a large tank creates massive stored energy. Over-pressurizing can cause the tank shell to rupture, risking fatal injuries. Use a pressure regulator and safety relief valve on the test air line.

    Procedure:

    1. Drain all compartments completely and flush them to ensure they are gas-free.
    2. Close all discharge valves, manhole covers, and vapor vents. Isolation plugs must be installed in place of the breather valves.
    3. Connect an air test manifold to the compartment’s vapor recovery port.
    4. Slowly pressurize the compartment to 35 kPa (5.0 PSI). Isolate the air supply.
    5. Monitor the pressure gauge for a period of 5 minutes.

    Pass/Fail Specs: The pressure drop must not exceed 1.0 kPa (0.15 PSI) over the 5-minute test duration. If the pressure drops faster, apply a soap-and-water solution to all weld seams, manhole gaskets, and valve flanges. The presence of bubbles will locate the leak path. Repeat this test for each compartment individually while adjacent compartments are at zero pressure to verify bulkhead integrity.


    Export operation note: fuel distribution routes and hot climates

    For export fleets working between terminals, depots, mines and filling stations, safety depends on routine discipline more than on one single component. Heat, dust, rough roads and mixed driver teams make small failures more likely: dry or cracked gaskets, loose U-bolts, blocked vapor lines, corroded grounding points and worn API adapter seals.

    When ordering a fuel tanker, include spare FKM/Viton seals, API adapter gaskets, grounding straps, P/V vent service parts, fire-extinguisher brackets, pneumatic fittings and valve box labels in the initial spare-parts package. These parts support safer field maintenance without improvising around fuel vapor and static electricity.

    Daily driver checklist before loading fuel

    • Static control: inspect grounding strap, grounding pin and terminal continuity light before any product connection.
    • Vapor control: confirm vapor vents open when the master air valve is activated and drain condensate from the vapor line as scheduled.
    • Valve control: check API adapter seal, emergency foot valve response, overfill socket condition and compartment switch labels.
    • Road safety: verify fire extinguisher tag, tire condition, U-bolts, suspension pads and that load is balanced by compartment.

    7. Maintenance & Safety Checklist

    7.1 🛠️ Preventive Maintenance Schedule

    Component Action Required Frequency
    U-Bolts Re-torque after the first 50-100km (Loaded) to compensate for rubber settling. Target torque is 300 Nm. New Trailer + Monthly
    Static Grounding Check the Earthing Strap for contact with the ground and conductivity. Measure resistance. 📅 Every Trip
    Valves Ensure all valves are fully closed. Do not leave in “Half-Open” position. 📅 Daily
    Pneumatics Clean air filters/strainers. Check system pressure. Drain condensate from separator. 📅 Weekly
    Breather Valves Professional inspection for sealing and pressure settings. Check spring tension. 📅 Quarterly
    Extinguisher Check pressure gauge (Green zone) and hose condition. Verify inspection tag. 📅 Monthly

    7.2 🚫 Critical Safety Rules

    1. No Overloading: Adhere strictly to the Gross Vehicle Weight (GVW) and compartment limits.
    2. No Ignition Sources: No smoking. Use only Non-Sparking Tools when working on the tank or valves.
    3. Confined Space Entry: NEVER enter the tank without: ① Full Depressurization ② Cleaning/Degassing ③ Forced Ventilation ④ Gas Testing ⑤ A Safety Spotter.
    4. Winter Precautions: If valves are frozen, DO NOT use open flames. Use steam or hot water to thaw.

    Transfer Control: Attendant, Emergency Stop and Disconnect Sequence

    Fuel tanker risk rises during loading and unloading because liquid movement, vapor displacement and hose connection all happen at the same time. Treat every transfer as a controlled operation, not a background task. One trained person should own the transfer from wheel chocking to final cap closure, and that person must be able to stop flow immediately.

    The control logic is supported by recognized safety references. OSHA 1910.106 addresses flammable-liquid handling, the PHMSA cargo tank inspection rule reinforces documented tank integrity, and the CSB Barton Solvents investigation shows why static bonding, grounding and equipment suitability cannot be treated as paperwork.

    • Before flow: chock wheels, set brakes, shut down unauthorized ignition sources, connect grounding/bonding, verify overfill protection and confirm the correct compartment/product match.
    • During flow: keep the attendant at the loading point, watch vapor line behavior, check API adapter leakage, monitor compartment level and stop if odor, alarm, pressure surge or abnormal hose movement appears.
    • Before disconnect: close flow first, allow line drain-down, close compartment valves, depressurize as specified by the terminal, then remove loading arm, vapor hose and ground connection in the approved sequence.
    • Before dispatch: confirm caps are locked, seals are installed, placards match the cargo, spill kit and extinguisher are present, and the driver has the terminal release record.

    For repeatable fleet control, pair this transfer record with the Kales semi-trailer maintenance manual and the semi-trailer troubleshooting guide. Electrical faults, brake defects and grounding failures should be solved before the tanker enters a fuel terminal.

    Need technical support or genuine tanker spare parts?

    Fuel tanker maintenance should not rely on improvised parts. Kales can help confirm API adapter parts, valve seals, grounding components, vapor recovery fittings and other export tanker spares for your exact configuration.

    ⚠️ Disclaimer
    This manual is based on the standard export configuration of Kales Vehicle Co., Ltd. Actual vehicle specifications may vary based on custom orders. Please refer to the technical documents delivered with your specific vehicle.
  • Tipper Trailer Operator Manual: Hydraulics, Safety and Maintenance

    Tipper Trailer Operator Manual: Hydraulics, Safety and Maintenance

    Published: October 31, 2025 | Last updated: May 30, 2026

    This comprehensive guide is designed for operators and fleet managers using Kales Tipper Semi Trailers. From understanding the advanced hydraulic tipping system to mastering safe unloading procedures and performing routine maintenance, this manual ensures maximum operational efficiency, safety, and longevity for your heavy-duty transport equipment.


    Technical basis and safety scope

    How this tipper trailer manual is supported

    This manual is based on Kales rear and side tipper operating practice, the hydraulic diagrams already shown in the article, and the pressure and stability limits stated in the guide. Key references include the hydraulic working range of 190-220 bar, relief-valve adjustment target of 190-200 bar under load, maximum lateral slope of 3 degrees, maximum wind speed of 30 km/h, and the requirement to dump only on firm, level ground.

    The safety basis is reinforced by public references on dump-body and workplace transport risk: NIOSH guidance on preventing injuries and deaths of dump truck operators, HSE guidance on workplace vehicle overturns, HSE quarry tipping-point guidance, HSE guidance on high-pressure hydraulic fluid injection, and an OSHA accident record involving a raised dump body. These sources support the same operating rule: assess the ground first, keep the tractor-trailer straight, stay clear of the raised body, and stop lifting if the load sticks or the body leans.

    Use this as an operator and maintenance guide, not as a replacement for the vehicle delivery documents. Before lifting any body, the driver must confirm PTO engagement, air pressure, cylinder condition, rear-door or side-gate locking, tractor-trailer alignment, ground bearing capacity and an exclusion zone around the trailer.

    1. Choosing the Right Kales Tipper: Rear vs. Side Tipping Trailer

    Selecting the correct unloading method is crucial for mining and construction logistics. Kales offers specialized tipping semi trailers designed for robust performance on rough terrain.

    ✅ The Kales Advantage: Whether utilizing a Rear Tipper or Side Tipper, all Kales trailers feature a unified, high-reliability hydraulic lifting mechanism. This ensures universal component compatibility, simplified maintenance, and proven performance across global operating conditions.

    1.1 Rear Tipper Trailer (End Dump)

    • Mechanism: The cargo box tilts backward, discharging material from the rear tailgate using a powerful telescopic cylinder.
    • Best Applications: Mining transport, stone quarries, gravel yards, and heavy construction sites.
    • Kales Features: Built with a heavy-duty chassis, front-mounted lifting cylinder, and a reinforced balance frame for superior stability during off-road operations.
    Heavy duty rear tipper semi trailer with hydraulic cylinder extended for mining

    1.2 Side Tipper Trailer (Side Tipping Semi Trailer)

    • Mechanism: The body tilts to either the left or right side, ideal for efficient roadside discharge.
    • Best Applications: Narrow railway projects, road construction, and sites with height limitations where a rear dump trailer cannot operate.
    • Kales Features: Utilizes an advanced multi-cylinder synchronized tipping system. Precision hydraulic balancing ensures twist-free tilting even with uneven loads.
    Kales side tipper trailer unloading construction material on site

    Buyer selection note: rear tipper or side tipper?

    Rear tippers and side tippers solve different site problems. A rear dump trailer is usually preferred for sand, aggregate, coal and quarry work where there is enough straight space behind the vehicle. A side tipper is useful for windrow discharge, road construction and narrow unloading zones, but it needs stricter attention to side slope and gate locking.

    • Choose rear tipping when payload concentration, simple structure and deep dump piles matter most.
    • Choose side tipping when fast linear discharge along a road, berm or stockpile is more important.
    • Check maintenance capacity before ordering side tippers, because hinges, side cylinders and locking mechanisms add inspection points.

    2. The Core: Kales Hydraulic Tipping System Explained

    Kales tipper trailers rely on a mature high-pressure hydraulic system (~18-22 MPa / 180-220 Bar), known for rapid response and precise lifting control under heavy loads.

    Hydraulic System Diagram for Rear Tipper Trailer

    Rear Tipper Hydraulic Principle Diagram

    1. Gear Pump (Hydraulic Power)
    2. Pneumatic Control Valve
    3. PTO (Power Take-Off)
    4. Telescopic Lifting Cylinder
    5. Quick Coupling Fitting
    6. Limit Valve (Safety Stop)
    7. Manual Cab Control
    8. Air Source
    9. Hydraulic Oil Tank


    Side Tipper Trailer Hydraulic Lifting System Diagram

    Side Tipper Hydraulic Principle Diagram

    1. Hydraulic Pump
    2. Directional Control Valve
    3. PTO Unit
    4. Hydraulic Limit Valve
    5. Side Shift Cylinders
    6. Tipping Control Valve
    7. Side Door Locking Cylinder
    8. Pneumatic Fitting

    Key Hydraulic Components

    • Power Unit (PTO Pump): Connects to the truck tractor gearbox to drive fluid flow.
    • Control Unit (Valve Block): The “brain” of the tipping system.
      • In-Cab Valve: Manual lever (Lift / Neutral / Lower).
      • Limit Valve: Automatically stops the tipper body at max angle to prevent cylinder over-extension.
    • Actuator (Hydraulic Cylinders): Hardened, chrome-plated cylinders designed for heavy-duty cycles and harsh environments.

    3. Step-by-Step Operating Guide

    ⚠️ Critical Safety Checklist:

    • Park on solid, level ground (Slope ≤3°). Never dump on soft soil or uneven terrain.
    • Engage the tractor parking brake completely.
    • Ensure no overhead obstructions (power lines, bridges) typically found in construction zones.

    3.1 Preparation (Side Tippers Only)

    1. Unlock the side gate using the pneumatic switch.
    2. Manually release any mechanical safety hooks on the cargo body.
    3. Check hinge pins: Ensure pins are locked on the correct side for discharge.

    3.2 Lifting the Trailer Body

    1. Depress clutch pedal and engage PTO switch. Slowly release clutch.
    2. Move in-cab lever to “LIFT”.
    3. Gently increase engine RPM to control lift speed. Smooth operation prevents chassis stress.
    4. To pause: Disengage PTO and move lever to “Neutral”.

    3.3 Lowering the Trailer Body

    1. Disengage PTO.
    2. Move control lever to “LOWER”.
    3. Gravity will lower the tipper box. Control descent speed by feathering the lever.

    4. Troubleshooting: Tipper Hydraulic Faults

    Use this guide to diagnose common issues with your tipping semi trailer.

    Symptom Most Likely Cause Quick Check Action
    Tipper Won’t Lift Electrical Issue (PTO) Check fuse; Listen for solenoid “click” when engaging PTO.
    Pneumatic Issue Check truck air pressure; Check for blocked air lines to the control valve.
    Hydraulic Issue Check if Limit Valve is stuck. Check hydraulic oil level.
    Tipper Won’t Lower Pneumatic Control Failure Check air lines on the lowering side of the valve. Check for stuck main spool.
    Slow Lifting Speed Pump Wear / Air Leaks Check engine RPM; Listen for air hissing; Check gear pump condition and relief pressure.
    Body Vibration/Jitters Low Hydraulic Oil / Aeration Stop immediately. Check oil tank sight glass to prevent pump cavitation. Bleed air from cylinders.
    🔧 Pro Tip: The most common cause for “No Lift” is a stuck Limit Valve due to mud or rust from off-road sites. Clean and lubricate regularly.

    5. Hydraulic Pressure Diagnostics & Relief Valve Calibration

    The hydraulic lifting mechanism of Kales rear and side tippers is a high-performance system operating at peak pressures between 190 Bar (19 MPa) and 220 Bar (22 MPa). Operating outside these safety limits can either render the trailer incapable of lifting its rated payload or lead to catastrophic component failure, such as ruptured steel hoses or damaged cylinder stages.

    5.1. Pressure Measurement Procedure

    To verify the operating pressure of the hydraulic system, follow this testing procedure:

    1. Locate the high-pressure test port on the side of the main pneumatic directional control valve (tipping valve).
    2. Connect a calibrated 0-400 Bar (0-40 MPa) fluid-filled pressure gauge to the test port using a high-pressure test hose.
    3. Fill the tipper trailer to its maximum rated capacity.
    4. Engage the PTO, place the cab lever in the “LIFT” position, and monitor the pressure gauge as the cylinder starts its primary telescopic stage.
    5. The pressure should rise rapidly, peaking as the cylinder lifts the heaviest initial load, and then stabilize.

    Diagnosis: If the pressure does not exceed 150 Bar and the cylinder fails to lift, the relief valve is set too low or the gear pump has internal wear, letting oil bypass the gears. If the pressure exceeds 240 Bar, shut off the PTO immediately. High pressure will damage the seal rings of the cylinder stages.

    5.2. Adjusting the System Relief Valve

    If adjustments are needed, locate the pressure relief adjustment screw on the tipping valve block:

    • Loosen the locking nut.
    • Using an Allen key, turn the adjustment screw clockwise to increase the relief pressure (typically 1 turn increases pressure by approx. 30 Bar).
    • Turn counter-clockwise to decrease the pressure setting.
    • Tighten the locking nut once the target pressure of 190-200 Bar under load is achieved.

    6. Safe Dumping Ground Assessment Guide

    A dump trailer is highly vulnerable to tipping over during the last stages of the lift. As the cylinder extends, the trailer’s center of gravity moves upward and backward. If the ground under the tires settles unevenly, even by a few inches, the trailer will lean, twisting the chassis and causing a rollover.

    6.1. Soil Bearing Capacity Assessment

    Before initiating any dump operation, the operator must assess the ground condition. Different soil types have varying load-bearing capacities under heavy wheel loads.

    Ground Surface Type Estimated Bearing Capacity Safety Risk Level Operator Action / Precautions
    Compacted Gravel / Asphalt High (>300 kPa) Low Risk Standard operation. Ensure tractor and trailer axles are in a straight line.
    Dry, Compacted Soil / Clay Medium (150-250 kPa) Moderate Risk Check for hidden underground voids. Re-check level after the first cylinder stage extends.
    Loose Sand / Mud / Wet Fill Low (<100 kPa) Critical Danger Do not dump. Tires will sink unevenly as weight transfers backward. Reposition to compacted ground.
    Freshly Backfilled Excavations Extremely Low Critical Danger Prohibited. The edge of the bank can collapse under the trailer’s rear dual wheels. Keep axles at least 3 meters away from slope edges.

    6.2. Environmental and Operation Limits

    • Maximum Lateral Slope: 3 degrees. If the trailer leans more than 3 degrees sideways, do not attempt to lift the body.
    • Maximum Wind Speed: 30 km/h (18 mph). High crosswinds acting on the large surface area of an extended tipper body create massive tipping forces.
    • Axle Alignment: The tractor and trailer must be aligned in a straight line. Jackknifed dump units are significantly more prone to rollover because the tractor cannot stabilize the trailer sideways.

    7. Telescopic Cylinder (Hyva / Kales OEM) Maintenance & Seals

    The front-mounted telescopic cylinder is the most valuable and highly stressed component of the tipper. Kales utilizes premium multi-stage cylinders (typically 4 or 5 stages depending on body length) with hard-chrome plating on all sliding sleeves.

    7.1. Cylinder Greasing and Inspection

    The cylinder pivots on two main points: the lower chassis trunnion mount and the upper body cross-head pin. These points experience massive loads during the initial lift stage.

    • Lower Trunnion Pins: Grease every 50 operating cycles using a lithium grease with solid molybdenum disulfide (MoS2) additives.
    • Upper Cross-head Bearing: Grease every 50 cycles. Inspect the retaining clips for wear or bending.
    • Sleeve Inspection: Wipe down extended sleeves weekly with a clean cloth to prevent dust and grit from damaging the wiper seals. Inspect for scratches, pitting, or chrome peeling.

    7.2. Troubleshooting Cylinder Seal Leaks

    If hydraulic oil film is visible on the cylinder sleeves when extended, it indicates a failing stage seal. Follow this diagnostic matrix:

    • Light Oil Film: Normal. A microscopically thin film of oil is required to lubricate the internal polyurethane seals.
    • Dripping Oil: Failing gland seal or damaged wear ring. Replace seal kit immediately. Running a leaking cylinder risks cylinder scoring and environmental contamination.
    • Stage Creep: If the tipper slowly lowers itself when the lever is in “Neutral”, the seal rings on the lower stages are bypassing oil internally, or the directional control valve spool is worn.

    Dump-site checklist before lifting the body

    • Ground: confirm compacted, level ground; stop if one wheel set sinks or the lateral slope exceeds 3 degrees.
    • Vehicle line: keep tractor and trailer straight. Do not lift when jackknifed or when rear wheels are close to a bank edge.
    • Hydraulics: check PTO, air control, relief-valve setting, hoses and cylinder stages before lifting under load.
    • Load: remove sticky material buildup and avoid lifting if cargo is frozen, bridged or stuck to one side of the body.

    Export fleet note: mining, quarry and rough-road operation

    For export fleets running in mines, quarries and remote construction sites, most tipper problems start as small inspection misses: loose U-bolts, dry cylinder pivots, contaminated hydraulic oil, bent door locks, worn suspension pads or operators dumping on soft shoulders.

    Order a spare-parts kit with hydraulic hoses, seal kits, PTO air fittings, hinge pins, grease nipples, rear-door or side-gate lock parts and hydraulic return filters. These parts are cheaper to stock than a trailer rollover, bent cylinder or blocked mine haul road.

    8. Maintenance Schedule & Lubricants

    8.1 Hydraulic Fluid Specifications

    Climate Condition Recommended Oil (ISO) Performance Benefit
    Winter (Cold Regions) L-HM 32 Anti-Wear Low viscosity ensures fast flow and prevents pump cavitation during cold starts (down to -20°C).
    Summer (Hot/Tropical) L-HM 46 Anti-Wear High viscosity protects the pump and directional valve spools in high-temperature environments (e.g., Africa/Middle East/SE Asia).

    8.2 Maintenance Checklist

    • Daily: Check for leaks in hoses and the hydraulic tank. Verify PTO engagement and check oil level on dipstick.
    • Weekly: Grease cylinder pins, lower trunnion mounts, and tailgate hinges with Heavy Duty Lithium Grease.
    • Monthly: Retorque structural bolts on the chassis frame and tipping hinge pins. Target torque is 350 Nm.
    • Every 6 Months: Drain hydraulic oil tank completely. Clean the suction strainer screen and replace the high-pressure return line filter. Refill with fresh hydraulic oil.

    Raised-Body Lockout: The Step That Prevents Fatal Tipper Accidents

    The highest-risk moment in tipper work is not normal driving; it is inspection, cleaning or repair while the body is raised. A telescopic cylinder is a lifting device, not a mechanical safety support. If a hose fails, a valve shifts, a PTO is engaged by mistake or sticky cargo suddenly releases, the body can drop or roll the vehicle without warning.

    This is why NIOSH dump truck safety guidance focuses on preventing injuries and deaths around dump bodies, and why quarry operators treat tipping points as controlled work zones under HSE tipping-point guidance. Hydraulic inspection also needs caution because high-pressure hydraulic fluid injection can cause serious injury even from a pinhole leak.

    • Before lifting: confirm ground bearing, tractor-trailer alignment, overhead clearance, wind condition and a no-person exclusion zone.
    • During lifting: keep PTO speed steady, watch for body lean, stop if cargo bridges, and never shake the body by abrupt clutch or valve operation.
    • Before inspection: lower the body whenever possible; if raised access is unavoidable, use the correct body prop or manufacturer-approved support before anyone enters the hazard area.
    • Before release: disengage PTO, return the control lever to neutral, confirm the body is fully seated, inspect hoses for fresh oil and record any repeated slow-lift or drift-down symptom.

    For fleet control, connect this raised-body release record with the Kales semi-trailer maintenance manual and the semi-trailer troubleshooting guide. That makes hydraulic faults visible before they become roadside failures.

    Final Thoughts: Safety is the Operator’s Responsibility

    Most Kales dump trailer accidents are preventable. By ensuring solid level ground, verifying operating pressure, and maintaining the telescopic cylinder, you protect your driver, your cargo, and your equipment.

    Need Professional Technical Support or Tipper Spare Parts?

    Don’t let a hydraulic failure disrupt your logistics operations. Our engineering team can supply genuine replacement valves, PTO pumps, and seal kits.

  • Semi-Trailer Troubleshooting: Brake, ABS, Tire and Electrical Faults

    Semi-Trailer Troubleshooting: Brake, ABS, Tire and Electrical Faults

    Published: October 30, 2025 | Last updated: May 30, 2026

    Keeping your Kales semi-trailer in top condition is essential for safety, compliance, and operational efficiency. Even high-quality trailers can develop issues over time due to wear, improper maintenance, or harsh operating conditions.

    This comprehensive guide outlines the most common Kales semi-trailer problems, their root causes, and step-by-step solutions—organized by system for quick reference. Whether you’re a fleet manager, owner-operator, or maintenance technician, this troubleshooting resource will help you minimize downtime and maximize trailer lifespan.

    Technical basis and diagnostic scope

    How this semi-trailer troubleshooting guide is supported

    This guide combines Kales service experience on export semi-trailers with public inspection logic used by professional fleets. The inspection framework follows the same safety priorities described in the CVSA North American Standard Inspection levels: brakes, air leakage, suspension, axles, wheels, tires, lighting and coupling hardware must be checked before a loaded vehicle returns to service.

    The brake and wheel-end sections are also supported by CVSA Brake Safety Day inspection results, which show why brake defects remain a fleet priority. Tire diagnosis references NHTSA tire safety guidance, and electrical diagnosis references the SAE J560 seven-conductor connector standard. For ABS, EBS and RSS system context, this article links back to the Kales semi-trailer braking systems guide.

    Exact service limits still come from the component fitted to the trailer: axle, brake chamber, slack adjuster, air valve, ABS ECU, suspension, landing gear and tire maker documents. If a trailer has air loss, smoking hubs, loose wheels, brake fire smell or unstable steering, park safely and call qualified service before moving again.

    Priority Typical symptom Action
    Stop now Hot hub, air loss, loose wheel, brake smoke Park, chock, isolate and repair before movement
    Repair before loading ABS fault, uneven tire wear, light failure Diagnose system and confirm correction
    Planned service Noise, slow landing gear, minor seepage Record, monitor and schedule parts
    ⚠️ Safety Warning: Always secure the trailer with wheel chocks and jack stands before performing under-chassis inspections. Ensure the air system is depressurized before disconnecting lines.

    1. Brake System Failures

    The brake system is critical for road safety. Ignoring early warning signs can lead to accidents or roadside violations.

    1.1. Weak or Delayed Braking

    Symptom Likely Cause Solution
    Reduced braking power Excessive clearance (drum/lining) Adjust clearance to manufacturer specs
    Worn brake linings Replace brake shoes
    Air leakage in brake circuit Inspect lines and valves; repair leaks
    Faulty emergency relay valve Replace repair kit or valve assembly

    1.2. Brakes Won’t Release (Dragging)

    Symptom Likely Cause Solution
    Brakes remain engaged Low air pressure (<0.8 MPa) Restore air pressure to 0.8 MPa
    Broken return spring Replace spring in brake chamber
    Bent pushrod Replace or straighten pushrod
    Incorrect stroke Re-adjust stroke length per Kales specs

    1.3. ABS Warning Light On (New)

    Symptom Likely Cause Solution
    Amber ABS light stays on Sensor gap too wide Push ABS sensor fully against tone ring
    Damaged sensor cable Inspect wiring for cuts; replace sensor
    🔧 Pro Tip: Always perform a full air system leak test during pre-trip inspections to catch issues early.

    2. Suspension System Issues

    Suspension problems affect ride quality, tire wear, and cargo stability.

    2.1. Noises from Suspension

    Symptom Likely Cause Solution
    Clunking or rattling Broken leaf spring Replace spring assembly
    Loose U-bolt nuts Tighten to specified torque (refer to manual)

    3. Fifth Wheel (Kingpin) Problems

    3.1. Handle Won’t Lock or Feels Loose

    Symptom Likely Cause Solution
    Handle doesn’t engage fully Improper position of locking hook Adjust set screw on right side:
    • Clockwise → reduces play (tighten)
    • Counter-clockwise → eases operation (loosen)

    4. Axle & Wheel Assembly Faults

    4.1. Wheel Wobble or Vibration

    Symptom Likely Cause Solution
    Visible oscillation Loose lug nuts Retorque to manufacturer specification
    Seized axle bearing Replace bearing immediately
    Bent rim Replace wheel assembly

    4.2. Overheated Wheels (Hot Hubs)

    Symptom Likely Cause Solution
    Hot hubs after trip Seized bearing / No grease Replace bearing; use correct Grease (ZG-4 / Lithium)
    Brake drag Diagnose brake system (See Section 1)
    Over-tightened axle nut Loosen and re-torque to spec

    4.3. Uneven Tire Wear

    Symptom Likely Cause Solution
    Shoulder wear / Feathering Axle misalignment Adjust tie rods; check alignment
    Center wear Over-inflation Inflate to Kales-recommended PSI
    Cupping Worn suspension parts Replace bushings or shocks

    5. Landing Gear Malfunctions

    5.1. Hard to Crank or Stuck

    Symptom Likely Cause Solution
    Excessive resistance Poor lubrication Apply grease to gears and screw
    Bent leg tubes Replace damaged leg section
    Grinding noise Worn gears Disassemble and replace gear set

    6. Electrical System Failures

    Electrical faults compromise visibility. Most issues are caused by poor grounds or corrosion.

    6.1. Lights Not Working

    Symptom Likely Cause Solution
    Lights flickering / Dim Bad Ground Connection Clean chassis ground point; check for rust
    One light out Burned-out bulb Replace bulb; check socket corrosion
    No lights working Loose 7-way plug Clean contacts; spread pins for better fit

    7. Advanced ABS/EBS Diagnostics & WABCO Fault Code Troubleshooting

    Modern semi-trailers rely heavily on electronic safety systems. Kales semi-trailers utilize premium WABCO Electronic Braking Systems (EBS) or Anti-lock Braking Systems (ABS). When a system failure occurs, the amber ABS lamp illuminates on the trailer’s nosebox or the tractor’s dashboard, indicating that the Electronic Control Unit (ECU) has detected a diagnostic trouble code (DTC).

    Diagnosing these electrical brake codes without a computer interface is possible using WABCO’s blink code functionality. By turning the ignition switch or diagnostic button ON and OFF in specific intervals, the ABS lamp will flash out numerical codes (blink codes). Understanding these codes allows mechanics to pinpoint failures instantly.

    Blink Code Component / Fault Description Root Cause Recommended Repair Procedure
    4 – 1 Wheel Speed Sensor (Sens-Axle 1 L) Air gap too large; sensor disconnected; tone ring damage. Measure AC voltage at sensor while spinning wheel (should be >0.2V AC). Adjust sensor bracket clearance to <1.0mm.
    4 – 2 Wheel Speed Sensor (Sens-Axle 1 R) Excessive hub play; dirty sensor face; cut wiring harness. Clean road grime/metal shavings from sensor face. Verify wheel bearing play and tighten spindle nut if loose.
    4 – 3 Wheel Speed Sensor (Sens-Axle 2 L) Corroded connectors; sensor out of position. Inspect ABS cable routing. Push sensor until it physically contacts the tone ring; it will self-adjust during first wheel rotation.
    4 – 4 Wheel Speed Sensor (Sens-Axle 2 R) Short to ground; broken copper conductor inside jacket. Conduct continuity test between pins 1 and 2 of the sensor connector. Target resistance should range between 900 to 2000 Ohms.
    7 – 1 ABS Modulator Valve (LHS) Solenoid short circuit; internal coil burnt; loose ground. Unplug modulator harness and check resistance across solenoids. Clean pins with contact cleaner; replace valve if coil is open circuit.
    7 – 2 ABS Modulator Valve (RHS) Moisture in valve housing; electrical short to frame. Verify air dryer cartridge performance. Drain water from air tanks; replace relay valve if corrosion has reached electrical solenoids.
    14 – 1 ECU Power Supply Voltage Low voltage (<9.5V DC); bad ground connection on Pin 1. Inspect 7-way tractor plug. Measure voltage under load at pin 7. Clean main ground bolt on the trailer frame.

    When replacing a WABCO modulator valve, always torque the mounting bolts to 22-28 Nm (16-20 ft-lbs) to avoid housing distortion. Additionally, ensure the exhaust port is clear of mud or road debris. Blocked exhaust ports prevent the brakes from releasing, causing immediate shoe glazing and dragging brakes.

    8. 7-Pin (SAE J560) Electrical Harness Voltage Drop Testing

    Electrical failures account for a substantial percentage of trailer downtime, especially dim lights or flickering ABS warnings. The standard commercial connection is the SAE J560 7-pin plug, which supplies both constant and switched power. Corrosion or high-resistance joints can lead to a severe voltage drop, causing the ABS controller to malfunction (requiring a minimum of 9.5 Volts) while tail lights work normally.

    ⚠️ Safety Warning: Never use a sharp probe to puncture wire insulation during testing. Puncturing the outer jacket allows moisture to enter, leading to copper oxidation (green rot) that destroys the harness over time. Always probe at connector backs or splice boxes.

    8.1. SAE J560 7-Pin Plug Wiring Standard

    • Pin 1 (White): Ground Return (Heavy gauge – must support total trailer current)
    • Pin 2 (Black): Clearance, side marker, and identification lamps
    • Pin 3 (Yellow): Left-turn signal and hazard warning lamps
    • Pin 4 (Red): Stop lamps and anti-lock brake device power
    • Pin 5 (Green): Right-turn signal and hazard warning lamps
    • Pin 6 (Brown): Tail, license plate, and clearance lamps
    • Pin 7 (Blue): Constant auxiliary power for trailer ABS unit

    8.2. Voltage Drop Test Procedure

    A simple resistance check using a multimeter can be misleading because a single copper strand will show continuity, but will fail to carry the required load. To perform an accurate voltage drop test under load, follow these steps:

    1. Connect the trailer to the tractor and switch ON all lights and hazard signals.
    2. Locate the main splice junction box (usually mounted on the interior front crossmember of the trailer).
    3. Set your digital multimeter (DMM) to DC Volts.
    4. Measure the voltage directly between the positive terminal (Pin 7 or Pin 4) and the ground pin inside the junction box.
    5. Compare this reading to the voltage measured at the tractor battery.

    Diagnosis: The voltage drop must not exceed 0.5V DC. If battery voltage is 12.8V and junction box voltage is 11.2V (a drop of 1.6V), there is excessive resistance in the circuit. Typically, this is located at the nosebox socket terminals, which expand over time and lose clamping force. Use a J560 terminal cleaning tool to remove oxidation and spread the male pins slightly to restore contact tension.

    9. Tire Wear Diagnostics and Mechanical Root Causes

    Semi-trailer tires are a massive operating cost. Uneven tire wear is rarely a tire defect; it is typically a symptom of a mechanical problem in the suspension, alignment, or wheel ends. Understanding how to interpret wear patterns allows fleet managers to address the underlying cause before a tire blowouts occurs.

    Wear Pattern Visual Description Primary Mechanical Root Cause Corrective Action & Maintenance Spec
    Cupping / Scalloping Undulating dips around the tire circumference. Failed shock absorber; loose wheel bearing; worn spring bushings. Replace shock absorbers (inspect for hydraulic oil leaks). Tighten axle spindle nut using 3-step torque method to ensure correct bearing endplay (0.001″ to 0.005″).
    Feathering Tread blocks worn smooth on one side and sharp on the other. Axle misalignment (toe-in or toe-out). Measure distance between kingpin and front axle hub ends using an alignment bar. Ensure variance is within +/- 1.6mm (1/16″). Adjust axle collar adjusters.
    Shoulder Wear (One Side) Smooth wear isolated to the inside or outside shoulder. Bent axle tube; overloaded trailer causing axle camber deflection. Check axle camber using an electronic level. Replace axle tube if bent permanently. Do not exceed rated gross axle weight rating (GAWR).
    Center Wear Tread in the center worn significantly deeper than shoulders. Consistent over-inflation. Adjust cold tire pressure to match the load-inflation tables provided by the tire manufacturer (typically 100-110 PSI for standard dual assemblies).
    Flat Spotting / Diagonal Wear Isolated flat patches across the tread width. Seized brake adjuster; out-of-round brake drum; aggressive brake lockup. Verify automatic slack adjuster function. Check drum runout using a dial indicator (maximum allowable runout is 0.25mm / 0.010″). Replace drums if warped.

    10. Regional Environmental Challenges & Fleet Case Studies

    Kales semi-trailers operate in diverse global environments, each presenting unique wear patterns and failure modes. Maintenance schedules must be tailored to these conditions to prevent premature failures.

    10.1. Mountain Routes in Latin America (Brake Heat and Retarder Discipline)

    On Andean routes in Peru, Chile, Colombia and Bolivia, long downhill gradients put continuous heat into trailer brakes. The safest response is not to cool hot brake drums with water at random, because sudden temperature change can shorten drum life and hide the root cause of overheating. Treat repeated hot-wheel reports as a system fault: tractor retarder strategy, descent speed, brake adjustment, lining condition, axle load and driver technique must be reviewed together.

    Operational recommendation: For mining and mountain fleets, specify brake capacity before purchase, train drivers to descend in the correct gear, and inspect drums, linings, hub seals and ABS sensor wiring after severe routes. Fleets comparing drum, disc, ABS, EBS and RSS options should also review the Kales braking guide linked below.

    10.2. The Sahel Desert and West Africa (Abrasive Dust Contamination)

    Trailers hauling agricultural and construction goods along West African corridors (Côte d’Ivoire, Mali, Burkina Faso) face extreme dust and heat. Sand particles bypass standard air seals, entering the brake slack adjusters and wheel hub assemblies, where they combine with grease to form an abrasive grinding paste.

    Field-service pattern: dusty corridors and unpaved job sites
    Trailers hauling construction goods, aggregates or agricultural cargo on dusty routes often show the same fault chain: abrasive dust mixes with grease, air tanks collect water and fine particles, landing gear screws become stiff, and wheel-end bearings run hotter than normal. This pattern is common on West African corridors, quarry roads and dry-season construction sites.

    • Increase wheel-end, landing gear and slack-adjuster lubrication frequency during dusty seasons.
    • Purge air reservoirs more often where humidity, dust and compressor oil carryover are present.
    • Use protective boots where the operating route exposes screw shafts and adjusters to mud or sand.
    • Record repeated hot hubs or hard cranking as route-related maintenance data, not isolated driver complaints.

    Roadside Triage: Stop, Repair Before Loading, or Log for Service

    A troubleshooting guide is only useful if the driver, dispatcher and workshop make the same release decision. Treat air loss, smoking hubs, loose wheels, cracked tire casings, locked brakes and missing brake lights as stop-now faults. Move the trailer only after it is parked safely, chocked and checked by qualified service personnel.

    The evidence base supports this conservative triage. CVSA’s Brake Safety Campaign Results reported that the 2026 unannounced Brake Safety Day placed 574 of 4,021 inspected commercial vehicles out of service for brake-related violations. For tire-related triage, NHTSA tire safety guidance emphasizes inflation, tread, damage and load as safety-critical checks before a vehicle continues operating.

    • Red: park and repair before movement when there is air pressure loss, a hot hub, a brake that will not release, a loose wheel, exposed tire cord or failed stop/turn lamps.
    • Amber: repair before the next loaded dispatch when the ABS lamp is on, one lamp circuit is intermittent, a hub runs warmer than its axle mate, or tire wear shows a mechanical pattern.
    • Green: log for planned service when the fault is minor, repeatable and does not affect braking, steering, wheel retention, lighting visibility or load support.

    For yard release control, link the fault log with the semi-trailer coupling and pre-trip checklist. That creates one record from driver symptom to workshop cause and final release.

    Final Thoughts: Prevention Is Better Than Repair

    Most Kales semi-trailer failures stem from neglected maintenance or incorrect servicing. By following a structured inspection schedule—and addressing minor issues early—you can avoid costly repairs, roadside breakdowns, and safety incidents.

    Need Professional Technical Support or Replacement Parts?

    Don’t let trailer downtime impact your fleet’s profitability. Our engineering team can analyze your operational parameters and recommend the ideal components.

    Need help applying this guide?

    Share your trailer type, payload, routes, operating climate, and photos with Kales. Our team can review the key points from this guide and recommend a practical specification for your fleet.

    1. Send photos of your tractor, trailer, or current component layout
    2. Confirm payload, road conditions, gradients, climate, and duty cycle
    3. Receive a specification or maintenance recommendation within 24 business hours

    Email: [email protected]  |  WhatsApp: +86 131 5638 8843  |  Request a quote